Introduction
This manual covers the Empowered Cash Register module. The Cash Register feature simplifies Point of Sale (POS) management, providing a seamless and adaptable solution for businesses. This user-friendly tool allows for the easy setup of multiple stores, cash registers, and cash drawers, with real-time inventory updates and efficient transaction logging. Key features include fast barcode scanning, receipt and invoice printing, payment processing, and automated day closings, ensuring a smooth and transparent POS experience.
Setup
Permissions Set
To begin using the Empowered modules, the Admin User needs to create the “EMPOWERED ALL USERS” permission set. This can be accomplished on the "Module Configuration" page, accessible through the “Search” icon in Business Central. Clicking on the warning message on the "Module Configuration" page will generate the "EMPOWERED ALL USERS" permission set automatically:


When the "EMPOWERED ALL USERS" permission set is created, it should be assigned to the users to enable them to use Empowered Modules. Admin User can assign “EMPOWERED ALL USERS” permission set for all users on the standard “Permission Set by User” Business Central page:

EMPOWERED ALL USERS Permission Set: allows Users to use Empowered modules when they are enabled.
When the "EMPOWERED ALL USERS" permission set is assigned, in order to allow users to use the Cash Register module, the Admin User needs to enable the module by selecting it on the "Module Configuration" page:

When a related module is selected, all separate module-related Empowered permission sets are automatically added to the “EMPOWERED ALL USERS” permission set. This eliminates the need to manually assign the module-related permission sets to all users as it is managed by the application. Apart from “EMPOWERED ALL USERS”, no other permission sets should be manually assigned if you intend to use Empowered modules.
The Cash Register module has 1 module-related permission set called “EXW CASHREGISTER”. Admin Users do not need to manually assign this permission set for other users if they have the “EMPOWERED ALL USERS” permission set assigned, and the module enabled in the “Module Configuration” page.

EXW CASHREGISTER Permission Set: Allows the User to utilize all Cash Register module-related functionalities and make changes in all Cash Register module-related pages and standard BC pages where Cash Register functionality is implemented.
Note: If you assign the module-related permission set but do not enable the module, most of the features within the module will not work.
Cash Register Setup
Additional setup is required to use Cash Register module. The setup can be accessed using the “Search” icon in Business Central. To open this page, the User needs to click on it:


General Journal
- Template Name: Specifies the general journal template name for cash register transactions.
- Batch Name: Specifies the general journal batch name for cash register transactions.
Sales Lines
- Editable Unit Prices: Allows the editing of Unit Prices by the salesperson. The amount in the “Cash Ticket” card can be edited if the “Editable Unit Prices” field is set to TRUE in the “Cash Register Setup”.
- Editable Discounts: Allows the insertion of discounts by the salesperson. Discount and Line Amount Excl. VAT in the “Cash Ticket” card can be edited if the “Editable Discounts” field is set to TRUE in the “Cash Register Setup”.
Cash Payments
- Cash Payment Type: Specifies the Payment Method used for Cash Payments.
- Rounding Precision: Specifies the value of the Cash Rounding Precision. The “Amount Including VAT” in the “Cash Ticket” is rounded according to this value by adding an additional ticket line with the G/L account specified in the Negative or Positive Amount field in this setup. The rounding line is added only when the Payment Type in the “Cash Ticket” is set to Cash. The User needs to open the “Payment” card from the “Cash Ticket” (using the “Payment” action), where the payment method can be selected. If the User changes the “Unit Price Excl. VAT” or “Line Amount Excl. VAT” while the rounding line already exists, the User needs to open and close the “Payment” card to update the rounding line with the correct numbers based on the updated amount.
- Negative Amounts: G/L Cost Account for negative rounding amounts.
- Positive Amounts: G/L Cost Account for positive rounding amounts.
Advance
- Payment Method: Specifies the payment method for item Advance.
- Item No.: Specifies the item no. Advance.
Voucher
- Payment Method: Specifies the Voucher Payment Method.
- Item No.: Defines the item no. used to buy gift Vouchers.
- Default Validity: Specifies the period during which the Voucher is valid.
- Minimum Spend: Min. amount that customers should spend so they can use a Voucher.
- Minimum Amount: Min. amount for the Voucher payments.
- G/L Account: G/L Account Vouchers do not spend.
End Text
- End Text Ticket: Specifies Text that is displayed at the bottom of the Cash Register Ticket.
- No. of Tickets to Print: Specifies the number of ticket copies to print.
Application
Cash Register List
“Cash Register List” can be accessed via “Cash Register Setup” -> “Related” or using the “Search” icon in Business Central.


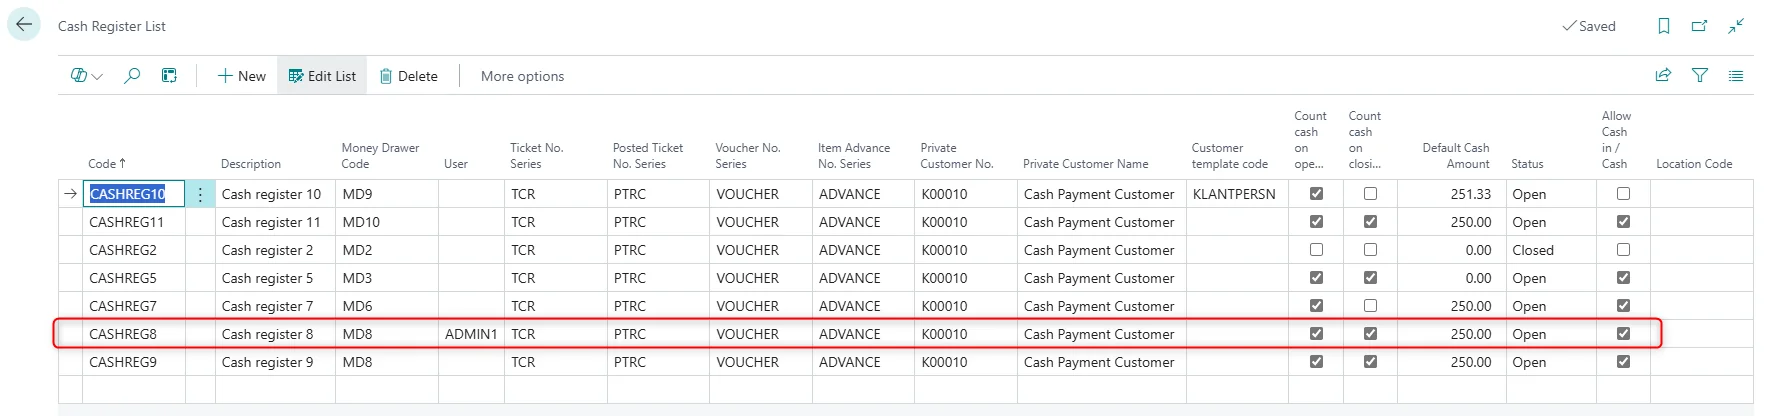
- Code: Specifies Code of the Cash Register.
- Description: Specifies Description of the Cash Register.
- Money Drawer Code: Specifies Money Drawer of the Cash Register. Money Drawers can easily be created on the “Money Drawers” page by entering Money Drawer Code and Description. User can create one or more Money Drawers to link to the different Cash Registers. Different Cash Registers can use the same Money Drawer.
- User: Specifies User that is working with the selected Cash Register. If the current system user does not assign themselves as the “User” in the “Cash Register List”, it will not be possible to open the “Cash Ticket Overview” page, create cash tickets, or perform other cash-related procedures. The same User can be assigned to only one “Cash Register List” line. Assigning the same User to multiple lines is not allowed and will result in an error message.
- Tickets No. Series: Specifies Number Series for the Cash Tickets.
- Posted Ticket No. Series: Specifies Number Series for the Posted Cash Tickets.
- Voucher No. Series: Specifies Number Series for the Vouchers.
- Item Advance No. Series: Specifies Number Series for the Item Advances.
- Private Customer No.: Specifies the Private Customer number. These customers do not require an invoice and are automatically assigned when creating a new Cash Ticket.
- Private Customer Name: Specifies Name of the Private Customer.
- Customer template code: Specifies Customers Template Code. This template is used by default when a user wants to create a new Cash Register Customer from the “Cash Ticket” card.
- Count cash on opening cash register: Specifies if Count Cash is available when opening Cash Register. When this setting is activated, the “Open Cash Drawer” page appears before we open the Cash Register, allowing User to add Coins and Notes to the Register.
- Count cash on closing cash register: Specifies if Count Cash is available when opening Cash Register. When this setting is activated, the “Close Cash Drawer” page appears before we close the Cash Register, allowing User to add Coins and Notes to the Register.
- Default Cash Amount: Specifies Default Cash Amount. The amount entered into this field is added to the Cash Register when opening.
- Status: Specifies Cash Register Status. This Status changes when we Open or Close Cash Register by clicking on “Open Drawer” or “Close Drawer” in the “Cash Tickets Overview” page or “Force Close” in “Cash Register List”.
- Allow Cash in / Cash out: When this setting is activated it allows User to add or extract extra money from the Cash Drawer.
- Location Code: Specifies Location where Cash Register is installed. This defines the inventory location for sales, overriding the default customer location on sales orders. Applies only to warehouses without full warehouse management; locations with bin mandatory enabled can be selected.
Actions
- Force Close: This is a special-purpose action for urgent scenarios where the cash drawer must be closed immediately, potentially bypassing the cash counting process.

- Open/Close Cash Count: This action opens „Open/Close Drawer List” page.

Open/Close Drawer List
„Open/Close Drawer List” can be accessed via „Cash Register List” -> „Related” -> „Cash Counts” -> „Open/Close Cash Count”. This page provides an overview of cash drawers both opening and closing cash counts. It displays key details such as the money drawer code, whether the default opening or closing cash amount was used, the opening and closing dates, whether the opening or closing was registered, and the total amounts recorded at both stages.

- “Open Cash Count”: action can be used when “Open Registered” field is marked as true.
- “Close Cash Count”: action can be used when “Close Registered” field is marked as true.

Movement types
“Movement types” can be accessed via “Cash Register Setup” -> “Related” or using the “Search” icon in Business Central.
Movement types are used to keep track of all the movements on the Audit Log page.

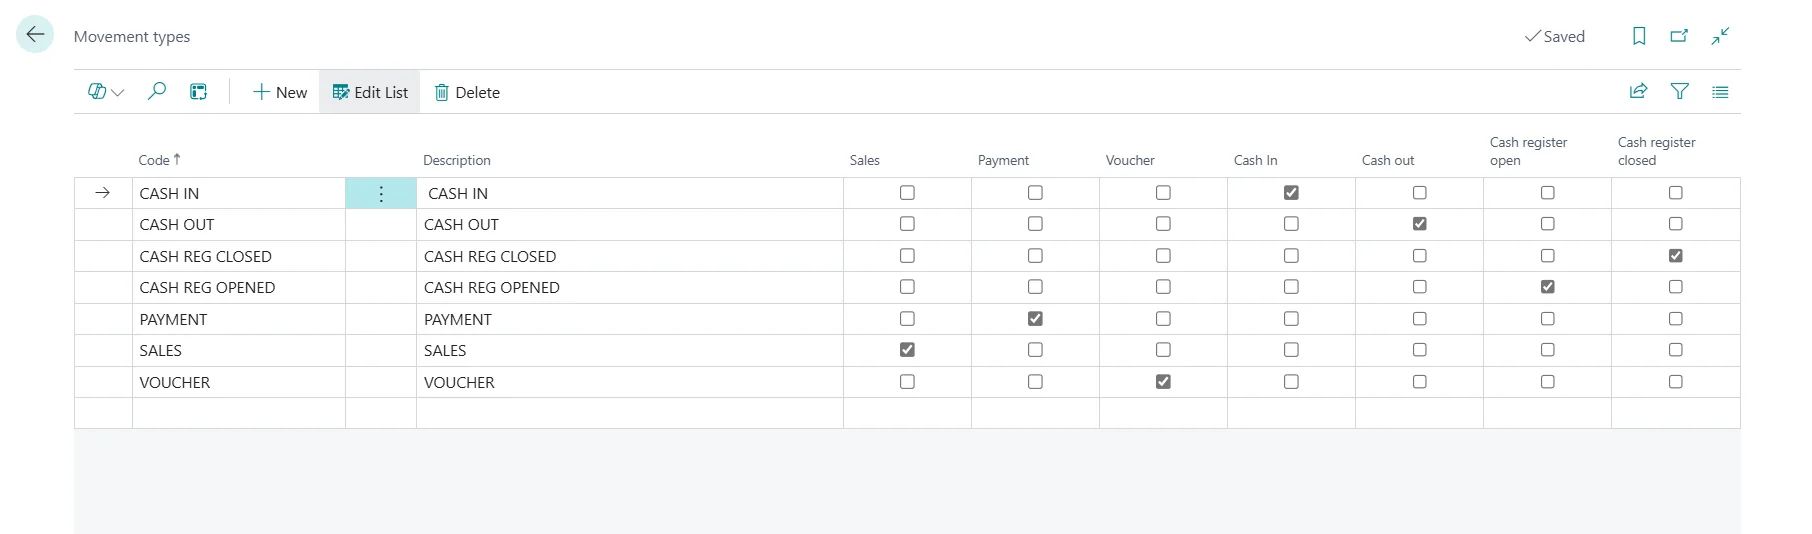
Movement types can be created for different activities. All Movements after using the related action will be visible and can be tracked on “Audit Log” page.
- Sales: After making a Sale (Cash Ticket related procedures: invoice, ship).
- Payment: After making a Payment.
- Voucher: After making a Payment with a Voucher.
- Cash In: After making a Cash In.
- Cash Out: After making a Cash Out.
- Cash Register Open: After opening the Cash Register.
- Cash Register Close: After closing the Cash Register.
Coins / Notes List
“Coins / Notes List” can be accessed via “Cash Register Setup” -> “Related” or using the “Search” icon in Business Central.


On this page Coins and Notes can be created. These are used to count the cash on the opening and closing of the Cash Register.
User can change the list or add Coins and Notes to match their currency.
Report Selection
“Report Selection” can be accessed via “Cash Register Setup” -> “Report Selection” or using the “Search” icon in Business Central.
On the “Report Selection” page, the User can define which reports are used for the different document types related to the Cash Register. These reports are selected based on the Usage type (such as Invoice, Shipment, Ticket, etc.).
Below is an example of how a report is defined for Usage: Invoice:

In addition to “Invoice”, User can also set up reports for the following usage types:
Usage | Report ID |
Shipment | 71665687 |
Ticket | 71665680 |
Voucher | 71665688 |
Credit Memo | 1307 |
Return Ticket | 71665685 |
Return Receipt | 71665684 |
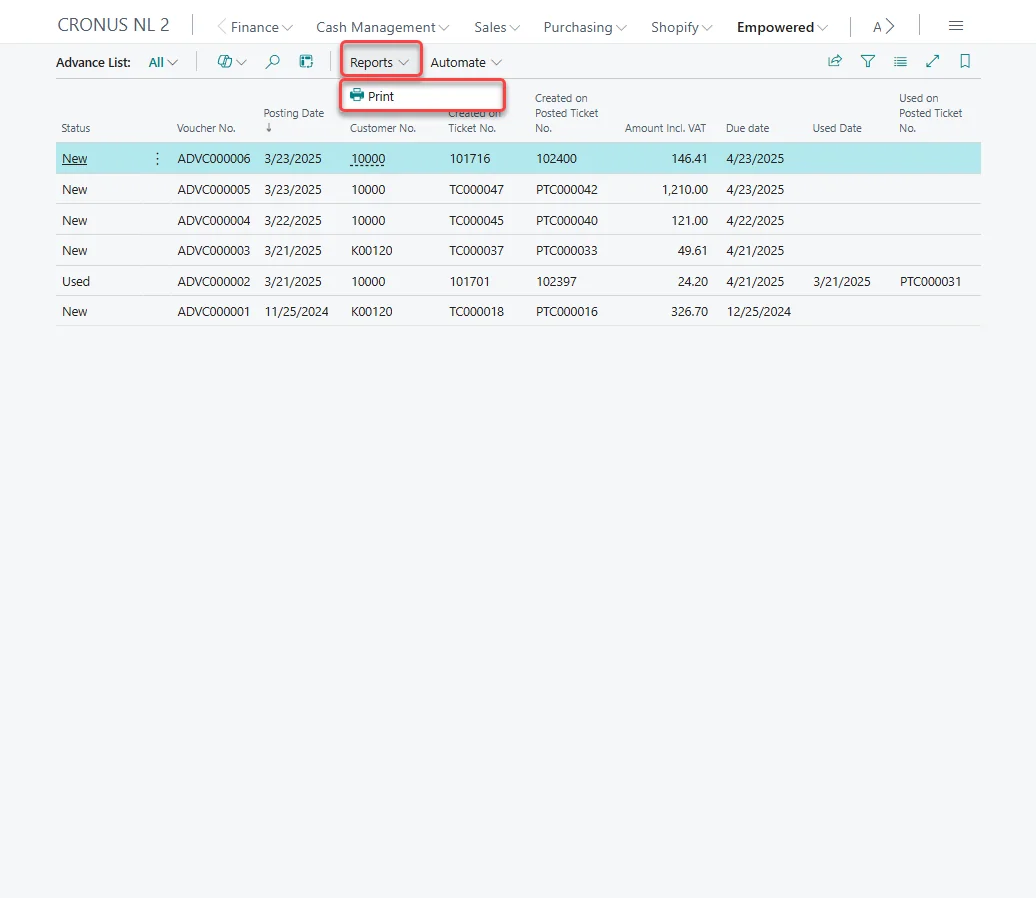
Voucher List
The “Voucher List” page can be accessed using the “Search” icon in Business Central. This page provides an overview of all generated vouchers and allows users to manage and access them. User can print the vouchers by clicking on “Reports” -> “Print”.

Advance List
The “Advances List” page can be accessed using the “Search” icon in Business Central. This page provides an overview of all generated advances and allows users to manage and access them. User can print the advances by clicking on “Reports” -> “Print”.
Audit Log
The “Audit Log” page can be accessed using the “Search” icon in Business Central.
This page gives a chronological overview of all the Movements (which are configured in the “Movement Types” page) for all Cash Registers.

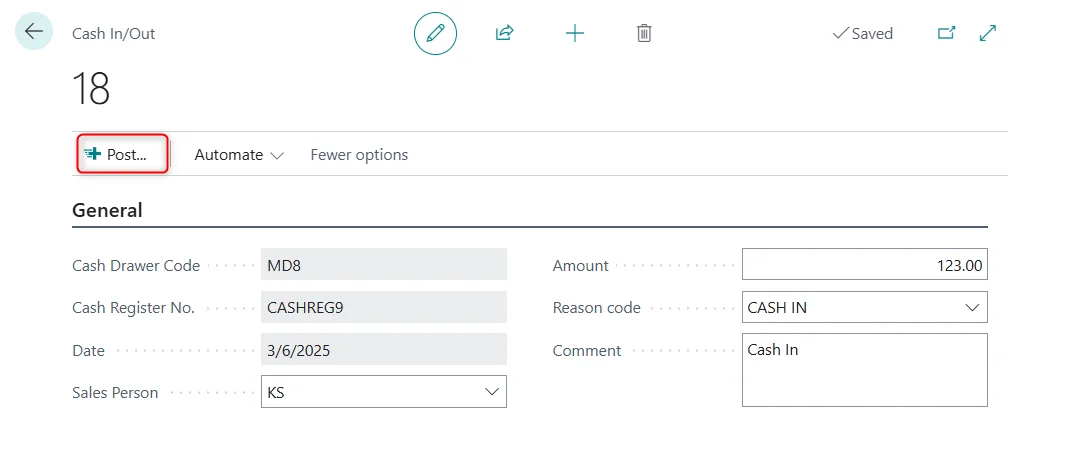
Cash In / Out
Action “Cash In / Out” can be found on the “Cash Tickets Overview” page. This action opens „Cash In/Out” page and allows the User to add or extract money from the Drawer for a specific purpose.

Action is visible only when Cash Register is open, and action is active only when “Allow Cash in / Cash out” is activated on the “Cash Register List” page.


Cash Drawer Code and Cash Register No. values come from the Cash Register List Entry, Date is equal to Work Day.
The User is required to choose a Sales Person, input the Amount, select a Reason Code (Cash In or Cash Out), and provide a Comment if necessary.
When all the information is filled in, the User can Post this Cash In/Out and Amount is added or extracted from the Drawer. Users can find Cash In/Out information on the Audit Log page (a movement type should be set up).

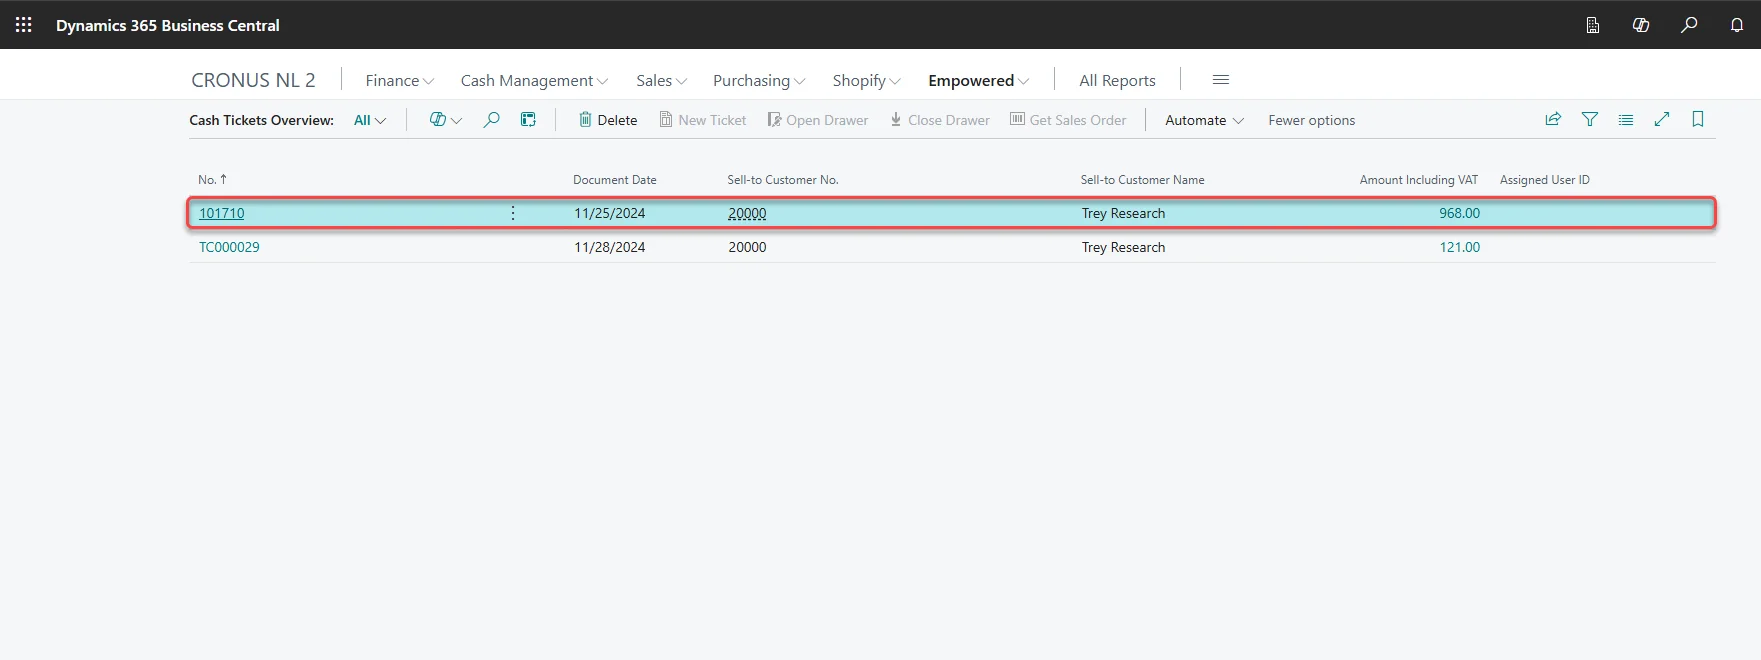
Cash Ticket Overview
The “Cash Tickets Overview” page can be accessed using the “Search” icon in Business Central.
NOTE: The page can only be opened when the current system User assigns themselves as the “User” in the “Cash Register List”.

Actions
- Delete: Action deletes selected Cash Tickets. Furthermore, it also removes the associated Sales Document. Each newly created Cash Ticket can be located in the related Sales Documents list.
- New Ticket: Action creates new Cash Ticket. This Action is active only when Cash Register is opened. The Cash Register Status can be found in the “Cash Register List”. To open the Cash Register, the User needs to use the actions described below.
- Open Drawer: Action opens Cash Register. This action is active only when Cash Register is closed. The cash register cannot be opened on the same day that it was closed.
- Close Drawer: Action closes Cash Register. This action is active only when Cash Register is opened.
- Cash In / Out: Action to add or extract extra money from the Cash Drawer. This action is displayed when the Cash Register is opened and becomes active when the "Allow Cash In/Cash Out" option is enabled on the “Cash Register List” page.
- Get Sales Order: The action involves creating a Cash Ticket from the Sales Order. If the user deletes such a ticket, the Sales Order is also deleted.
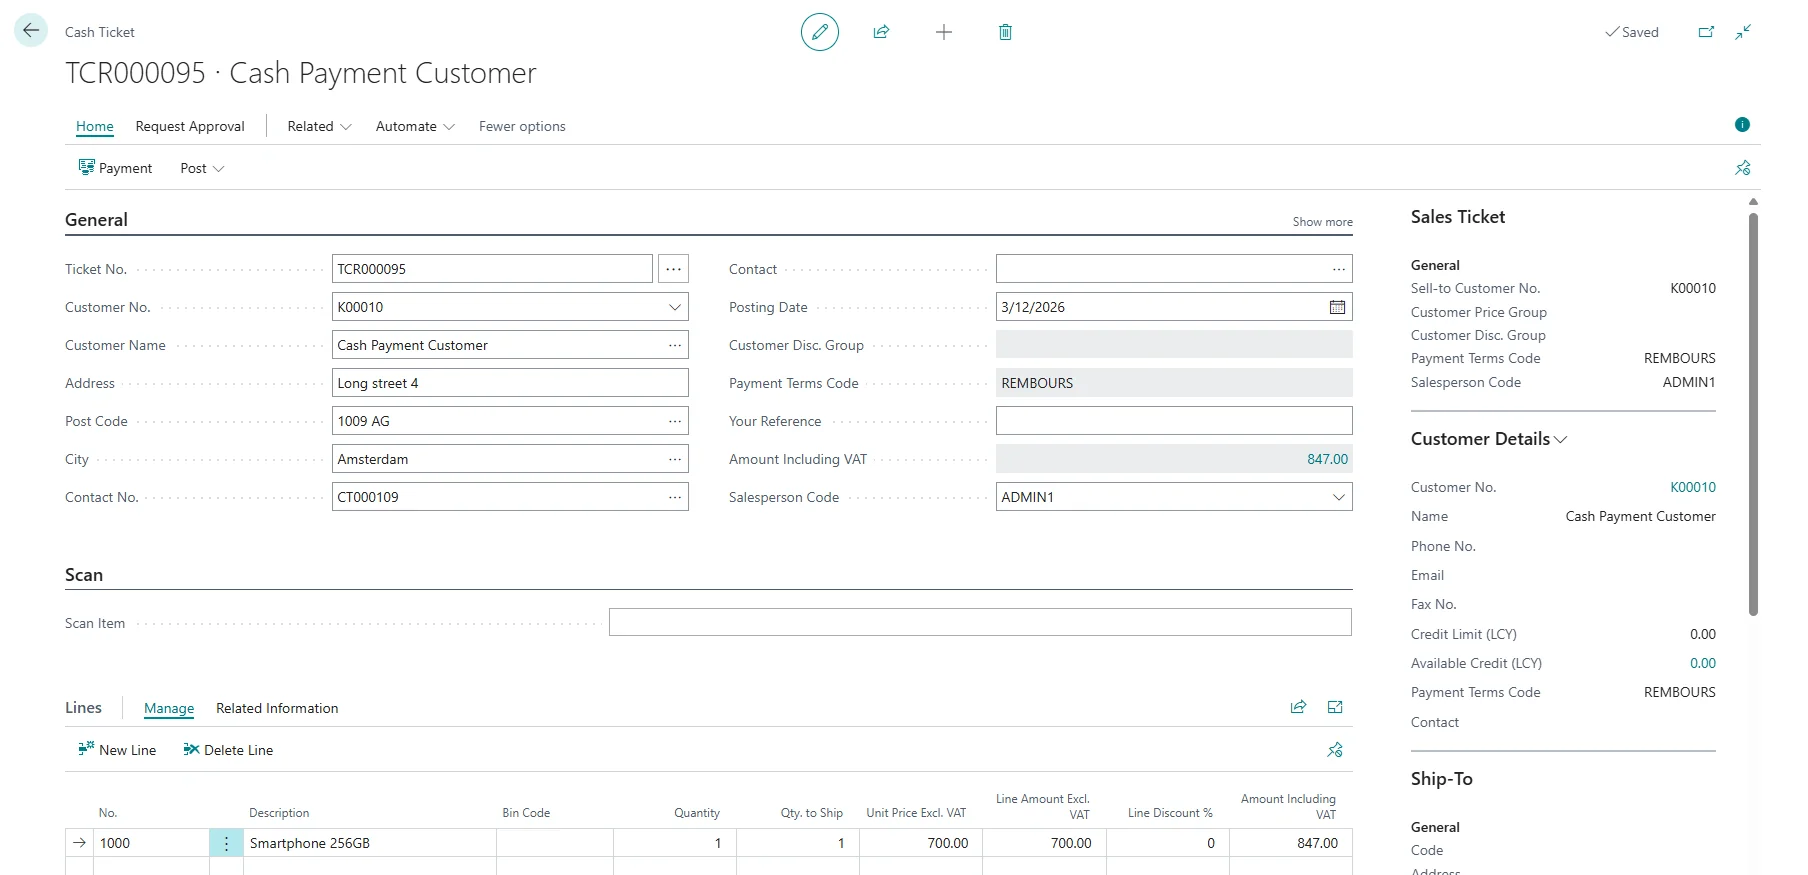
Cash Ticket Card
New Cash Ticket can be created by clicking “New Ticket” action on the “Cash Tickets Overview” page after Cash Register is opened.

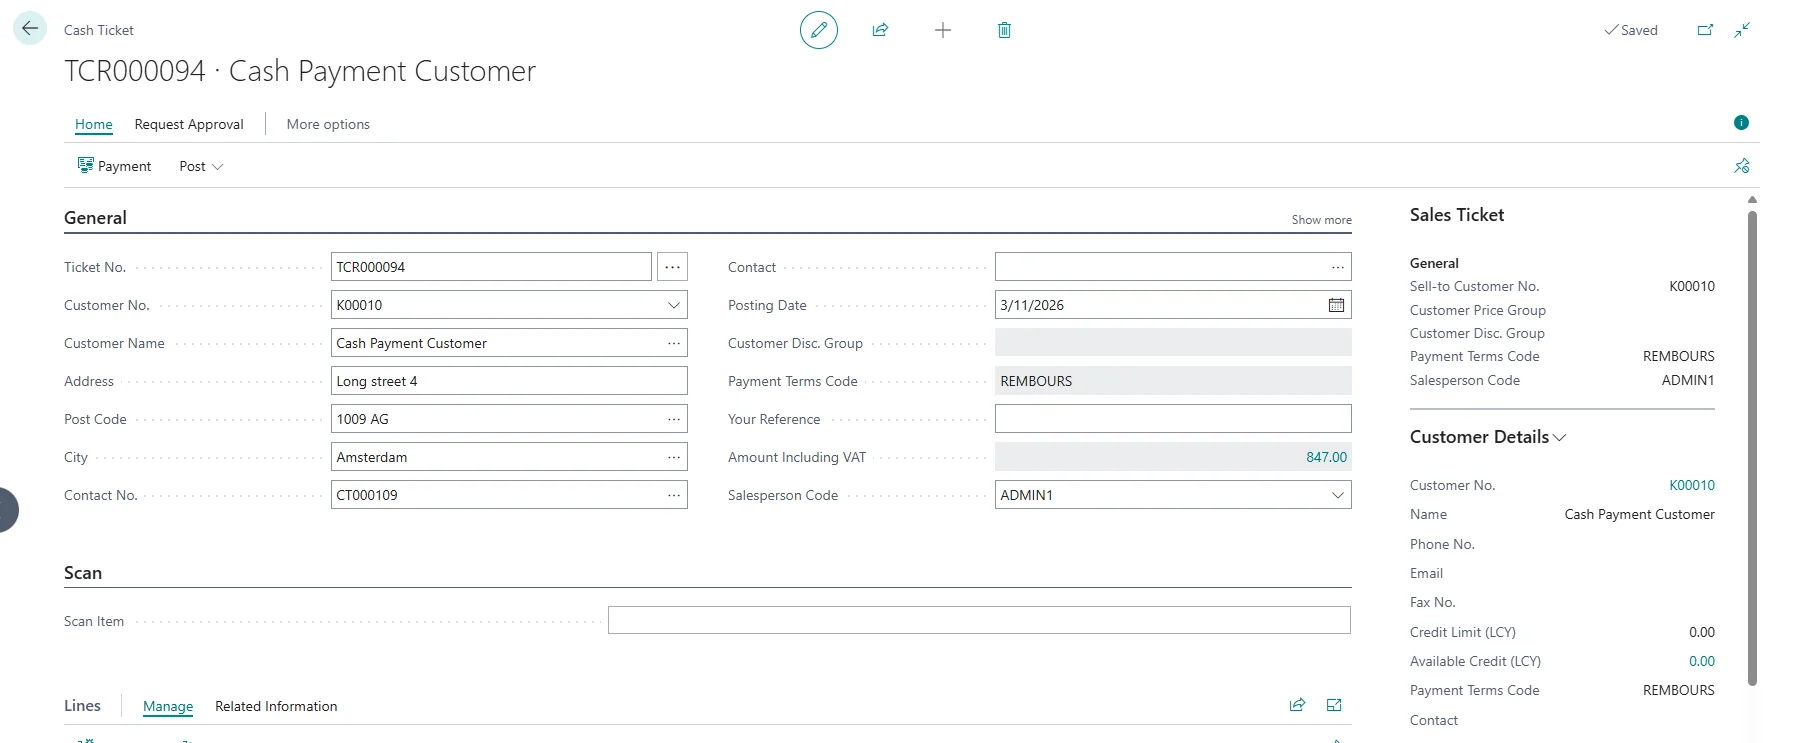
- Ticket No.: Automatically fills in with the Number Series from the Cash Register List Entry.

- Customer Information: All information in the General Tab related to the customer is sourced from the customer selected in the “Cash Register list” as a Private Customer. The User has the ability to modify this information.

NOTE: If the "Private Customer No." field is left empty in the “Cash Register List”, no customer information will automatically populate in the “Cash Ticket” Card, and the User will need to select the customer manually.
- Posting Date: Automatically fills in with the Work Day.
- Your Reference: User can add a Reference if required.
- Amount Including VAT: Automatically fills in with the Amount from the Ticket Lines after Item is added to the Ticket Lines.
Scan Item: If a barcode scanner is available, the barcode can be scanned here for quick item entry. Alternatively, the item number can be manually entered in this field, providing flexibility in how items are inputted and ensuring a smooth and efficient checkout process.
Lines
User can Select an Item from the dropdown menu on the Number field. When the Items are added, the system will calculate the amount, including VAT on the Ticket header.
Actions
- Invoice: Action records the invoice or credit memo. This action is active only when the professional (please find the professional customer explanation in the section below). Customer is entered into the Cash Ticket.
- Ship: Action records the shipment. This action is active only when the professional Customer is entered into the Cash Ticket.
- Post and Print Ticket: Action finalizes and prepares the ticket for printing.
FactBoxes
- Shipments: The FactBox allows the User to view shipments associated with the Cash Ticket after a Sales Shipment has been made. It becomes visible only after reopening the Cash Ticket.

- Vouchers: FactBox shows Vouchers linked to the selected cash ticket based on the document number (Ticket No.) rather than the customer. It becomes visible only after reopening the Cash Ticket.

- Item Advance: FactBox provides details of Item Advances linked to the selected cash ticket. It becomes visible only after reopening the Cash Ticket.

- Sales Ticket: FactBox provides the primary information regarding Cash Ticket.
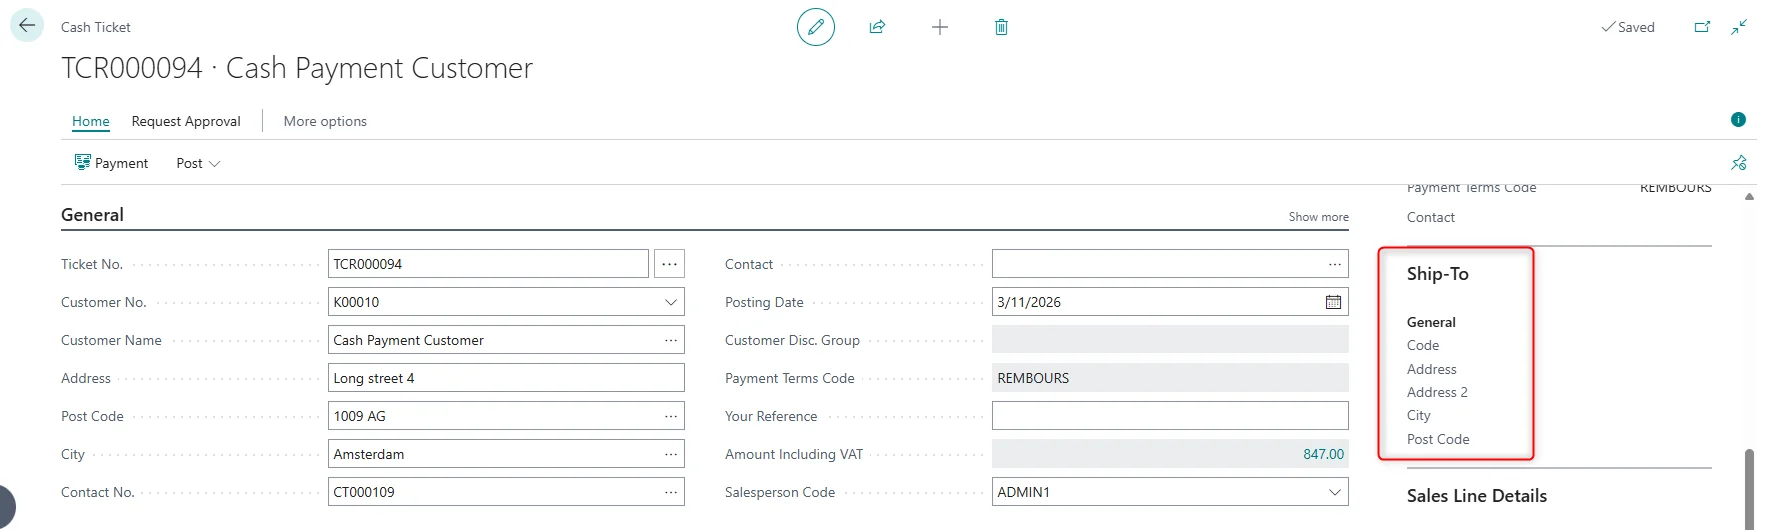
- Ship-To: FactBox presents more detailed information about Ship-to-Address based on the Alternative Shipping Address defined in the Sales Order related to the Cash Ticket.
Cash Register Customer Card
To open the “Cash Register Customer Card”, the User can click on the "Customer" action or on the drop-down menu in the "Customer No" field.
There are two types of customers: “private” (individuals buying for personal use, usually without an invoice) and “professional” (businesses purchasing for work-related purposes, requiring an invoice).

This page is designed for users with restricted access to customer information, limiting their ability to view extensive details or modify essential data. While it selectively displays only limited information, the source for this page remains the standard Customer page. Therefore, all newly created Cash Register Customers can be found on the standard Customers list. When a User creates a new Cash Register Customer, they can only enter or edit limited information.

General
- No.: Specifies the number of the customer. The field is either filled automatically from a defined number series in “Sales & Receivable Setup” “Customer Nos” field or User enters the number manually.
- Name: Specifies the name of the customer. When creating a new customer, upon entering the customer name, validation occurs, and some fields are automatically populated from the template defined in the “Cash Register List”. If the Customer Template Code is not defined in the “Cash Register List” and the User tries to enter the customer name, an error message will prompt the User to select a template.
- Address: Specifies the customer's address.
- Address 2: Specifies additional address information.
- Post Code: Specifies the postal code.
- City: Specifies the customer's city.
- Enterprise No.: Specifies company registration number or VAT number, which is used for legal and tax purposes.
- Country/Region Code: Specifies the country/region of the address.
- Payment Terms Code: Specifies the payment terms code.
Contact
- Phone No.: Specifies the customer's telephone number.
- Email: Specifies the customer's email address.
When creating a new Cash Register Customer, certain values are auto-filled from the customer template chosen in the “Cash Register List”. If the User opts not to use the default customer template when creating a new customer, they can choose a different template by clicking on the "Apply Template" action and selecting the preferred one.

Payment Page
To open the “Payment Page” where the payment can be registered, the User can click on the "Payment" action in “Cash Ticket” page.

- Total Amount Incl. VAT – The total amount to be paid, including all applicable taxes.
- Total Paid – The total amount that has been paid using the selected payment method.
- Total Discount – The total value of discounts applied to the transaction both from header and lines.
- Customer No. – The Customer number.
- Total Return – The total amount that needs to be refunded to the customer if the selected payment method is not cash.
Process
In this chapter the processes of the Cash Register in Business Central are described and explained. At the beginning, a Cash Register List will be created with random data, and it will be used throughout the process description to clearly demonstrate the data origin and the functioning of Cash Register module actions.
Creating Cash Register List Entry
Before opening the Cash Register and creating the Cash Ticket we need to set up the Cash Register List Entry. To work with this created entry, the User needs to assign themselves as the “User”.
Newly created entry gets status “Open”.
Creating Cash Ticket
To create a new Cash Ticket, click “New Ticket” action.

The Cash Ticket Card opens, and the data in the General FastTab is automatically populated with the information from the Customer selected as Private Customer on the “Cash Register List” page.

In the Ticket Lines User can add an Item and change the Quantity.

NOTE. Price and Discount can be added/edited only when “Editable Unit Prices”, “Editable Discounts” fields are active in the “Cash Register Setup” page.
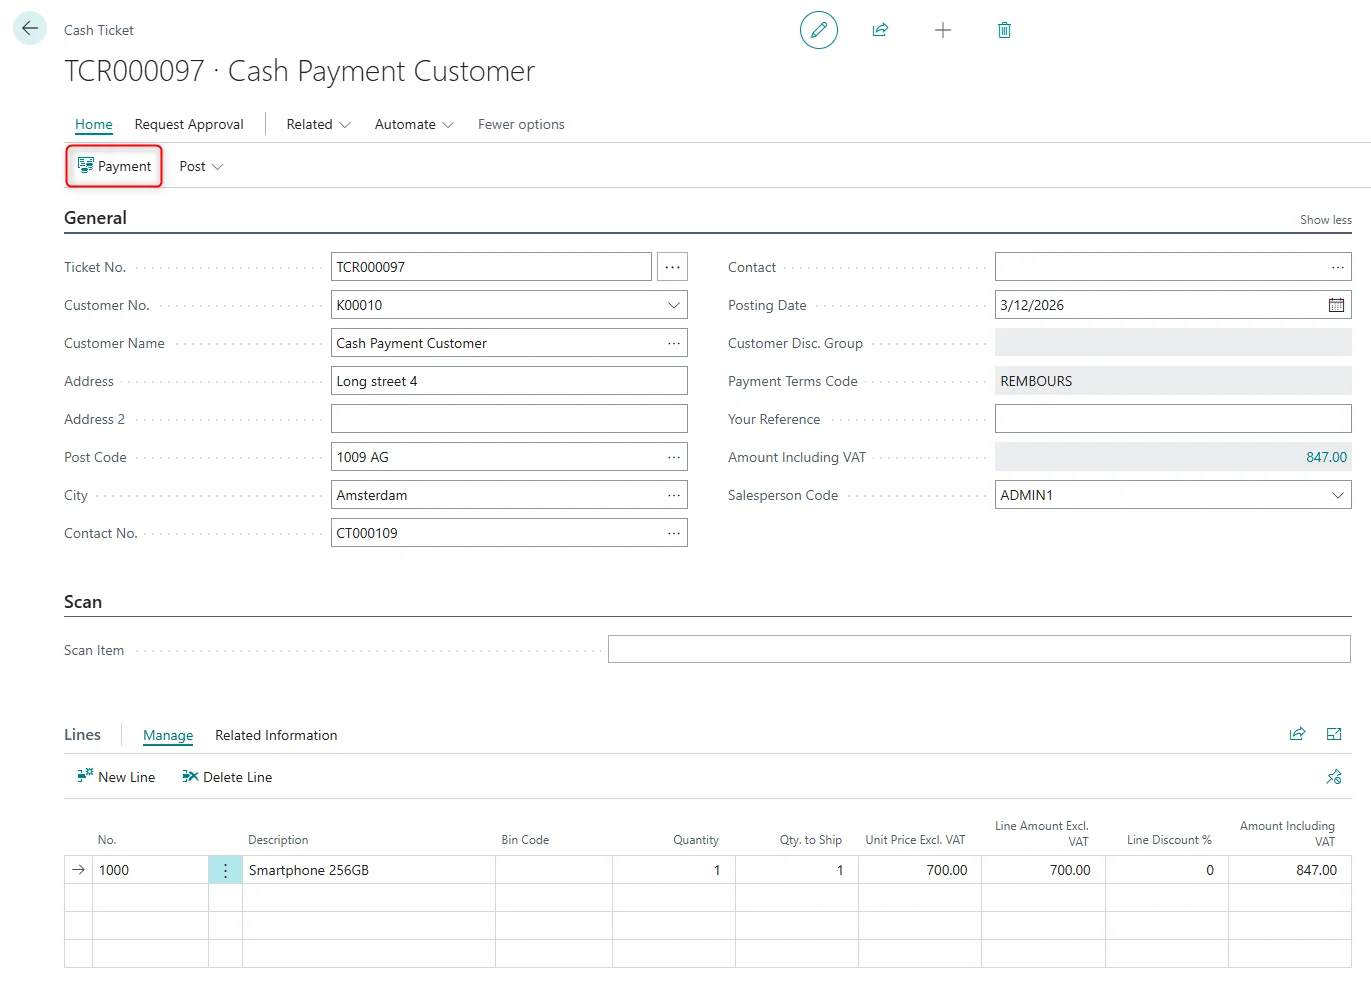
After Item is added to the Ticket Lines User can click on the “Payment” action.

Cash Ticket creation from Sales Order
Cash tickets can be created not only manually but also from existing Sales Orders. This can be done in two ways.
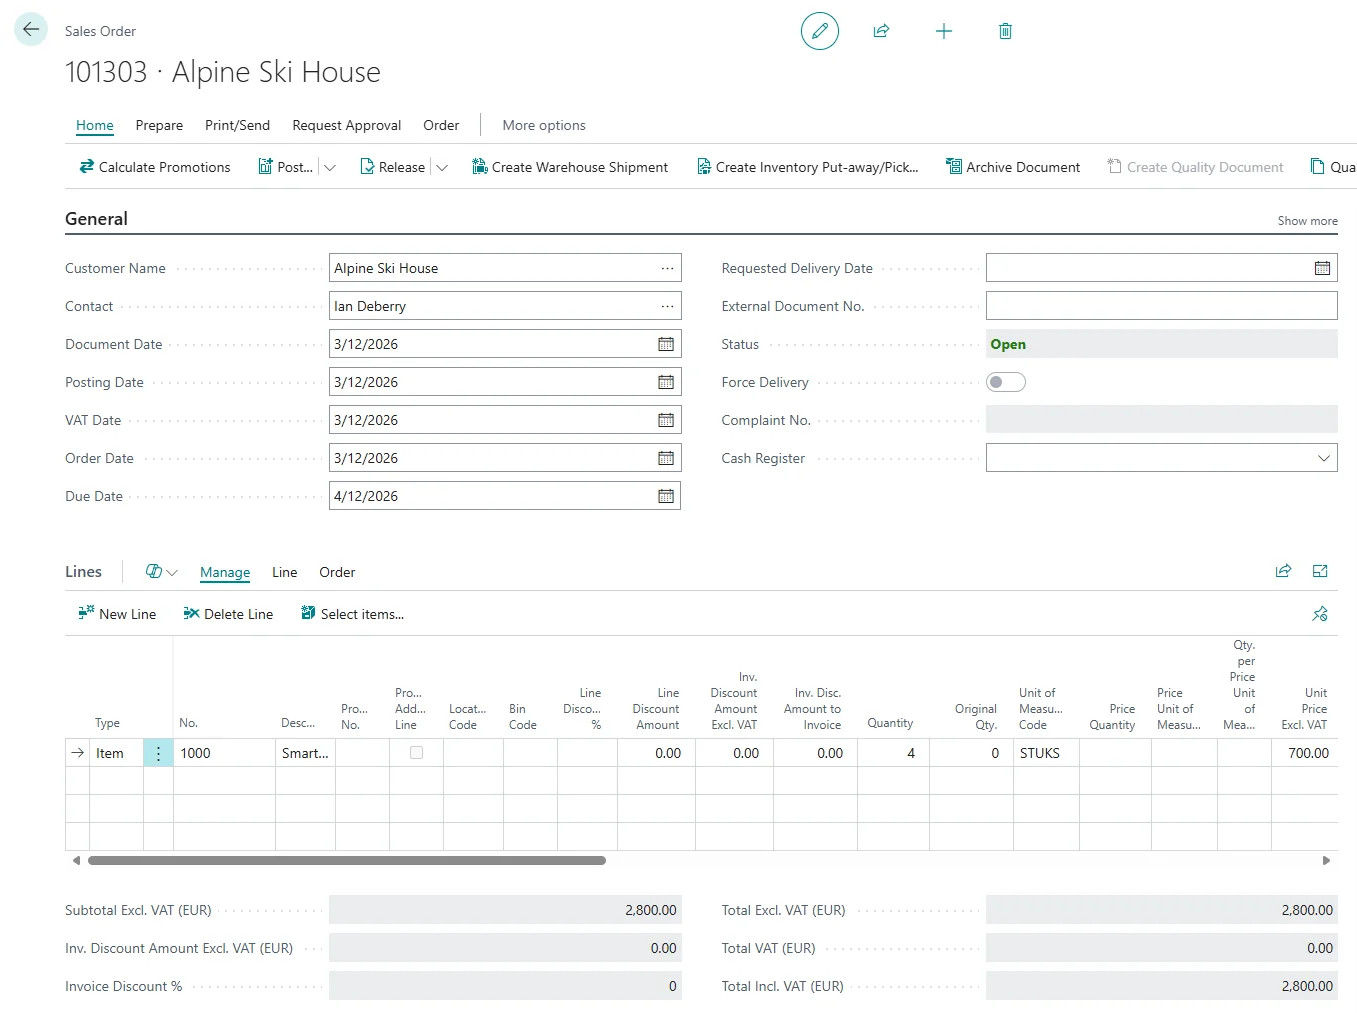
First: We have created a simple Sales Order:
Now the User needs to click on the “Get Sales Order” action on the “Cash Ticket Overview” page and enter Sales Order number in “Scan Order” field:

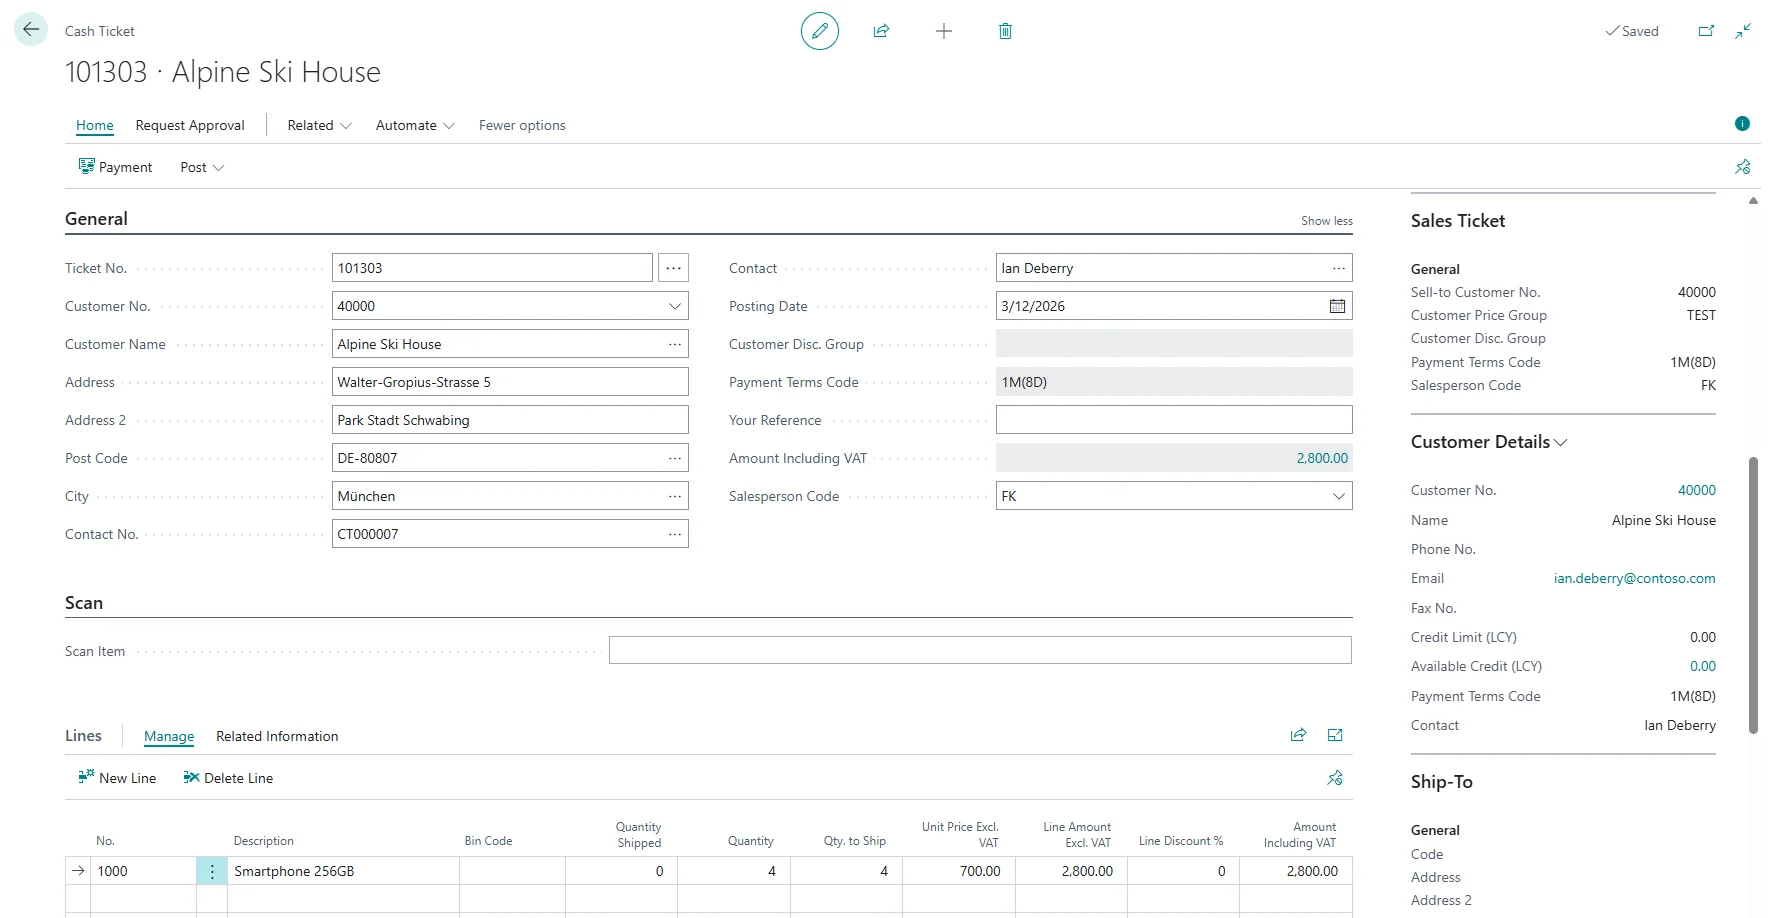
New Cash Ticket opens with the information from Sales Order:
Second: User can create a regular Sales Order and link it to a specific cash register using the “Cash Register field”, which is located under the General FastTab in the “Sales Order” card.

At the same time, the Sales Order also appears as a Cash Ticket on the “Cash Ticket Overview” page.
Making a Payment
All payment details are displayed in the page header when the “Payment” page opens. The “Total Amount Incl. VAT” indicates the amount to be paid.
Users can choose from multiple payment methods: Cash, Card, or Voucher. Field “Document No.” becomes active when the selected Payment Method matches the method chosen in the “Cash Register Setup”, Advance, or Voucher tabs, allowing the User to specify the Voucher or Advance number. In this example User uses Cash as a Payment Method.

User can enter greater Amount that is needed for a Payment. In that case the system will automatically deduct the entered Amount from the “Total Amount Incl. VAT” and add a new line with deducted Amount.

Users can also enter an amount that is less than the total payment due. In that case the system will automatically calculate the “Amount still to pay” field value.

In our case User enters the Amount that is equal to the “Total Amount Incl. VAT” and clicks “Close” action.

Now User can Post the Document and Print the Ticket. For “Private” customers, the “Invoice” and “Ship” actions will not be available in the “Post” action group on the ribbon. They will be available only for “professional” customers.
NOTE. Ticket can be Posted and Printed only when the Payment is made.

Cash Register Ticket is downloaded locally to the User’s computer. When User opens the Ticket, they can see both the original and a copy of the Ticket, containing all the necessary information:
- Customer Information;
- Ticket information;
- Payment Information.


Two operations with detailed information have been recorded in the “Audit Log” since all movement types have been configured in “Movement Types” page.

Closing Cash Register
On the Cash Registers closing, a cash count will be performed. To close the Cash Register we need to go to the “Cash Tickets Overview” page and click “Close Drawer” action.

Before Cash Register is closed, “Close Cash Drawer” page opens if the “Count cash on closing cash register” field is activated in the “Cash Register List” page.

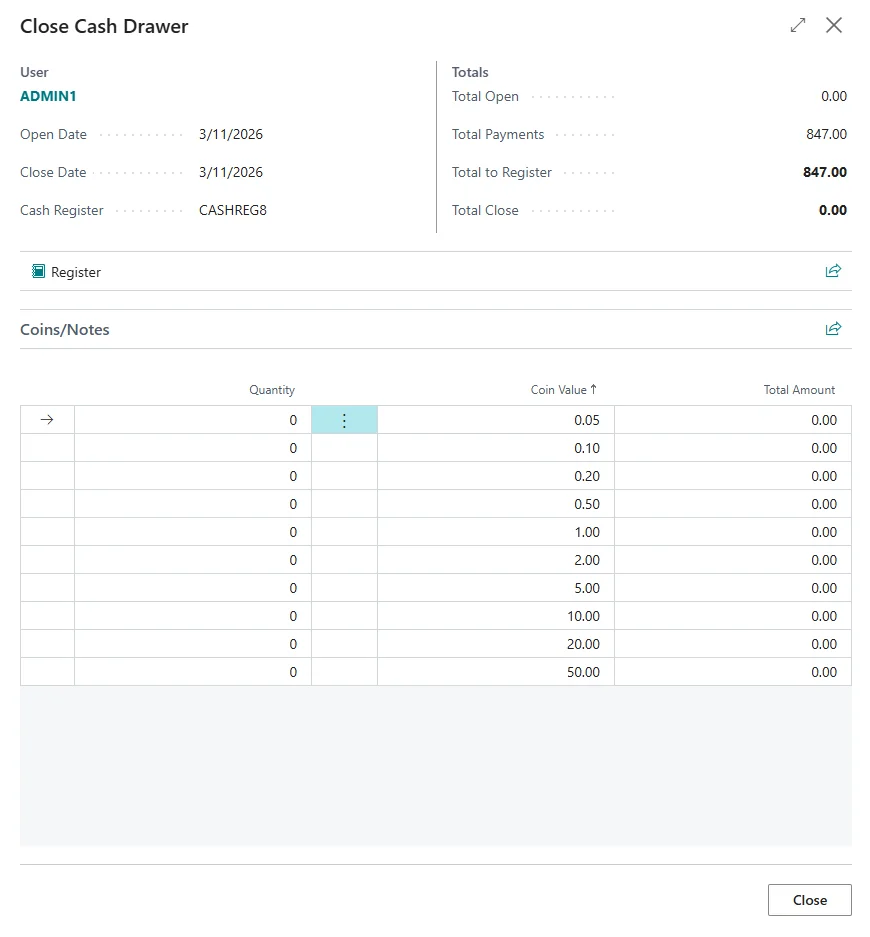
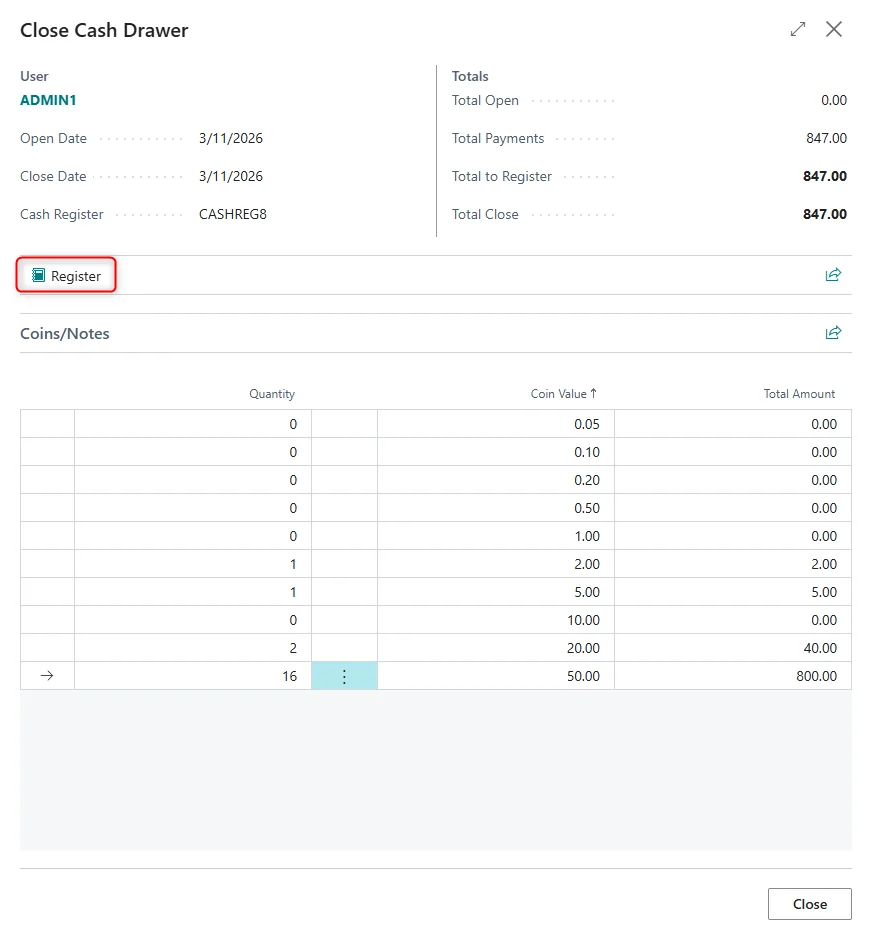
User needs to add the Quantities of Coins and Notes counted. “Total Close” needs to be equal to “Total to Register” in the header. If Amounts do not match, then the error message is shown.

When “Total Close” Amount is equal to “Total to Register” Amount, User can click on “Register” to close the Cash Register.
Since the Cash Register is closed, the only available action is “Open Drawer”.

The operation was recorded in the "Audit Log" page.

Cash Ticket posted through the Sales Order
Cash tickets are often used for quick, direct sales transactions (like over-the-counter sales). Cash tickets posted through a Sales Order are used when the sale is part of a larger, pre-processed order that needs to be tracked and documented.
For this example, the Cash Register needs to be already opened. See the "Opening Cash Register" section for instructions.
To post Cash Ticket through the Sales Order User needs to create a new Cash Ticket.
Users can copy the Cash Ticket Number to make it easier to locate in the Sales Orders list.

In the “Sales Order” card, the User can view the linked Cash Register number. All information in the Sales Order is identical to that in the Cash Ticket.

When the User posts the Sales Order, a Posted Sales Invoice is generated and the Cash Ticket disappears from the "Cash Ticket Overview" page.


Opening Cash Register
Opening the Cash Register requires navigating to the “Cash Tickets Overview” page and selecting the “Open Drawer” action. The drawer cannot be reopened on the same day it was previously closed.

Before Cash Register is opened, “Open Cash Drawer” page opens if the “Count cash on opening cash register” field is activated in the “Cash Register List” page.

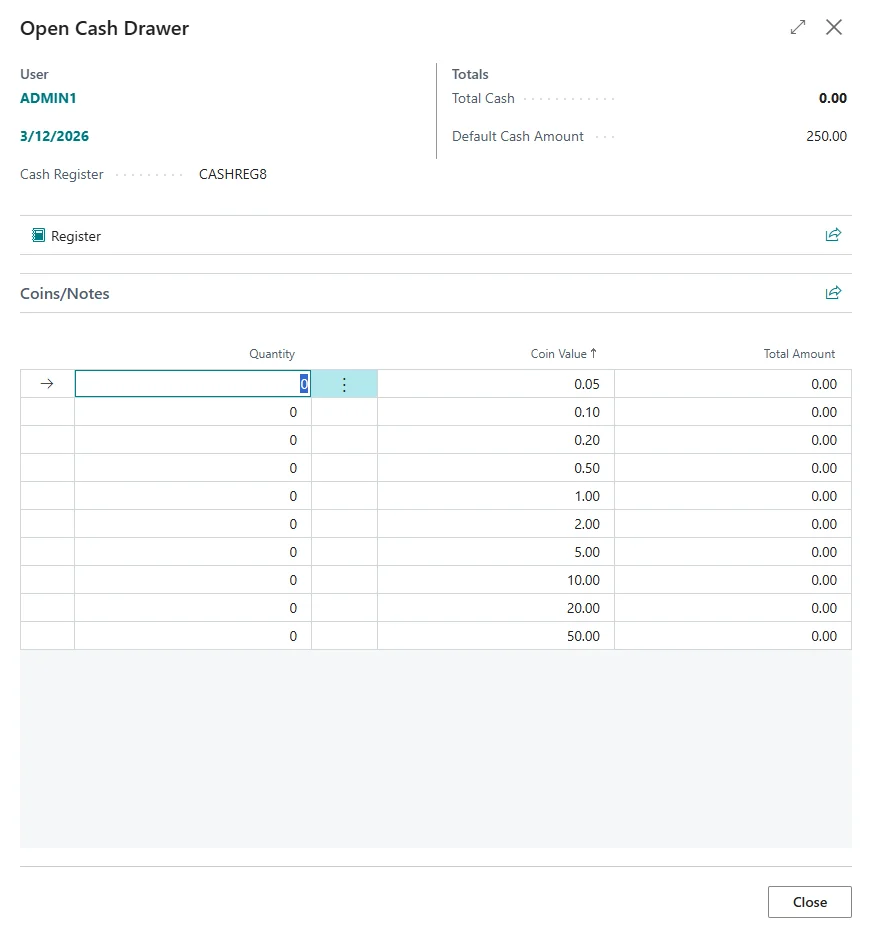
NOTE: If the “Count cash on opening cash register” field is not activated, Cash Register will open without any additional page.
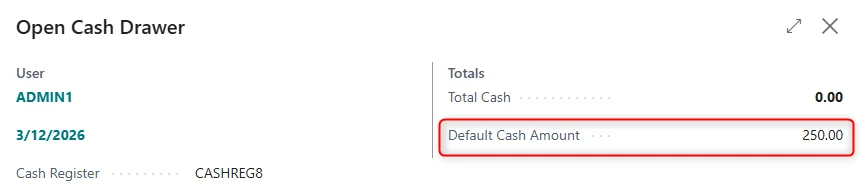
The "Default Cash Amount" value is also retrieved from the Cash Register List page.
Enter Quantities for the Coins and Notes in the Coins/Notes lines. Sum of all Coins and Notes and their Quantities are shown in the “Total Cash” field.
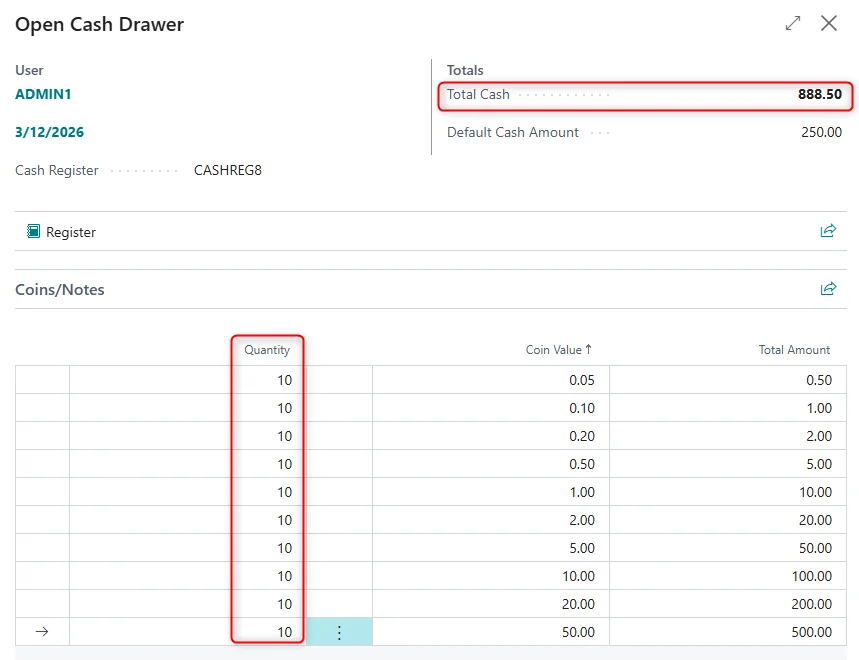
Click “Register” action.

Cash Register successfully opened, and the operation is logged on the “Audit Log” page.

“Open Drawer” action is now not active because only one Cash Drawer can be active at the time.

When the Cash Register is open, the status on the "Cash Register List" page is displayed as Open, and vice versa.

Creating a Voucher
Before the User can create a voucher, the Cash Register and Cash Ticket must be opened.
On the Cash Ticket Lines User needs to select VOUCHER Item which was specified in the “Cash Register Setup” page, “Voucher” FastTab. Enter the Unit Price of the Voucher.

NOTE. Amount needs to be greater than the Minimum Amount value (if entered) in the “Cash Register Setup” page.
On the “Payment” page which opens when clicking on “Payment” action, User needs to select a Payment Method (cash, card, etc.) and enter Amount, then close the page.

Next User needs to Post and Print the Ticket.


Vouchers validity date is set according to the Cash Register Setup.
After Cash Ticket was Posted and Voucher was Printed, Voucher can be found on the “Voucher List” page.

All operations were logged on the “Audit Log” page.

Making Voucher Payment
User can process a customer return with a Cash Ticket and generate a Voucher when they do not provide a cash refund or replace the goods for a customer.
To use a Voucher, in our example, the Cash Register needs to be opened, and Cash Ticket needs to be created.
In the “Cash Ticket” Card, User needs to click “Payment” action.
On the “Payment” page User needs to select “Payment Method” – Voucher.

NOTE. When using Payment Method – Voucher, Amount field cannot be edited, it comes from selected Voucher.
User can select Voucher by clicking on “Document No.” field.

Vouchers that are still valid according to “Due date” and Work Day can be used.

Vouchers Amount deducts from the “Total Amount Incl. VAT”.

Next, we need to Post and Print the Ticket.
Voucher payment is completed after posting the Cash Ticket, and all operations are logged on the “Audit Log” page.

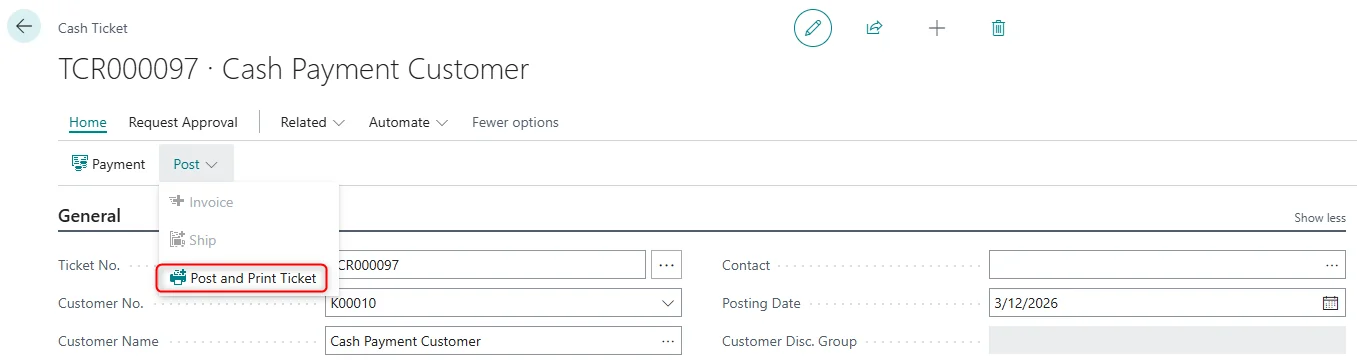
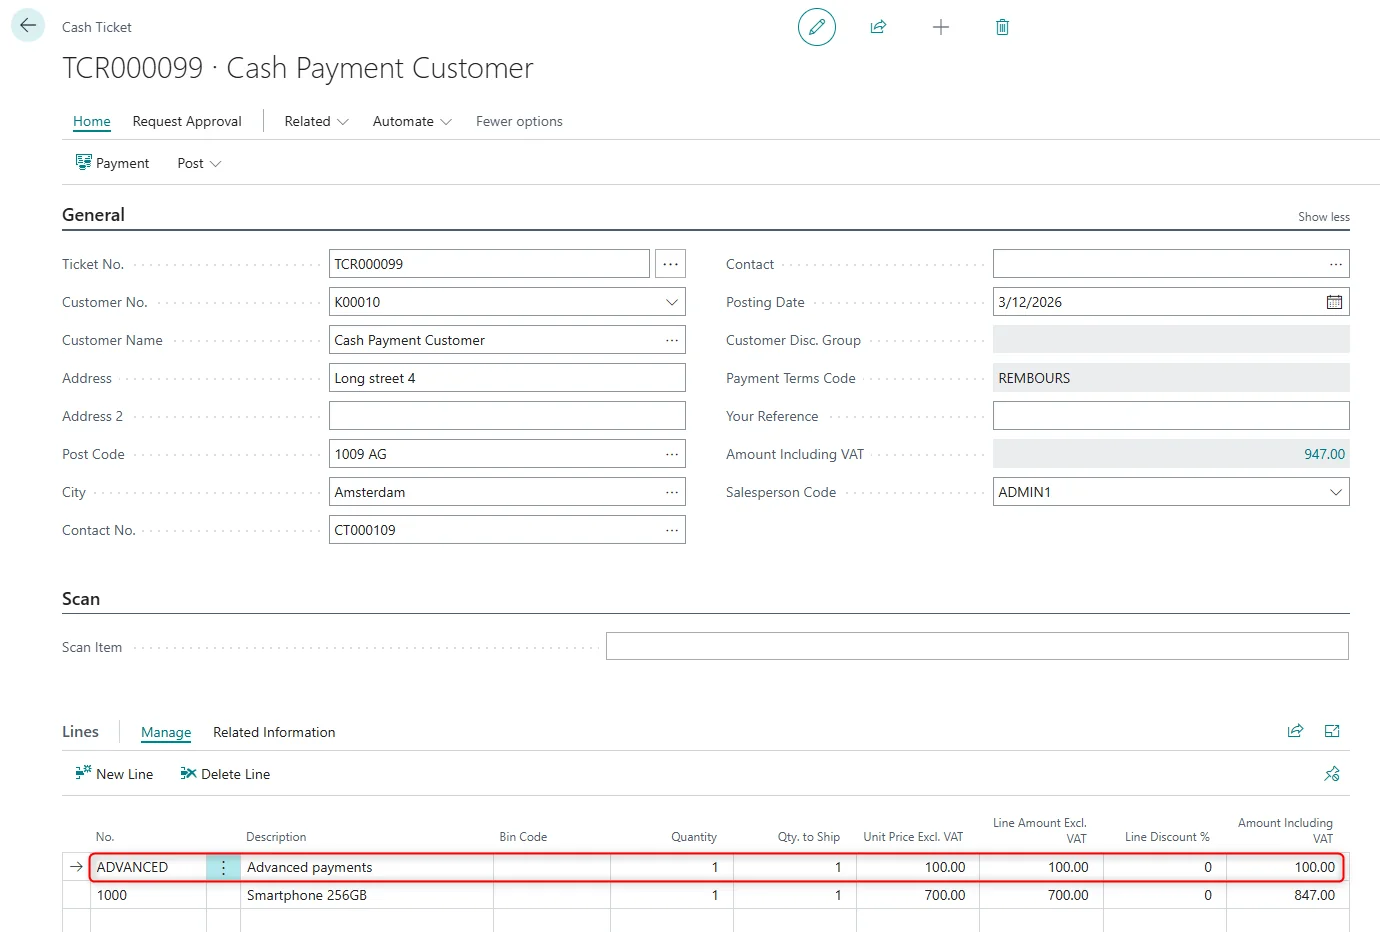
Making Advance Payment
To register an advance payment on Cash Register tickets, User need to create a Cash Ticket, select the Advance Item (which was specified in “Cash Register Setup”) on the lines, enter the Quantity and Amount.
In the Cash Ticket Card, User needs to click on “Payment” action.

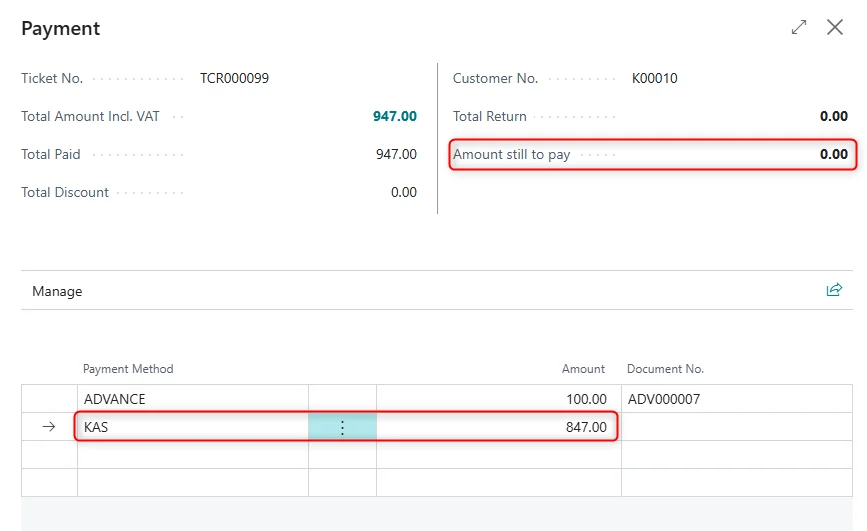
On the Payment page User can select Payment Method – Advance and select Advance by clicking on “Document No.” field.

Advances that are still valid according to “Due date” and Work Day can be used.

Advances Amount deducts from the “Total Amount Incl. VAT” field. “Amount” field cannot be edited because value comes from the selected Advance.

User needs to enter remaining amount using any other Payment Method.
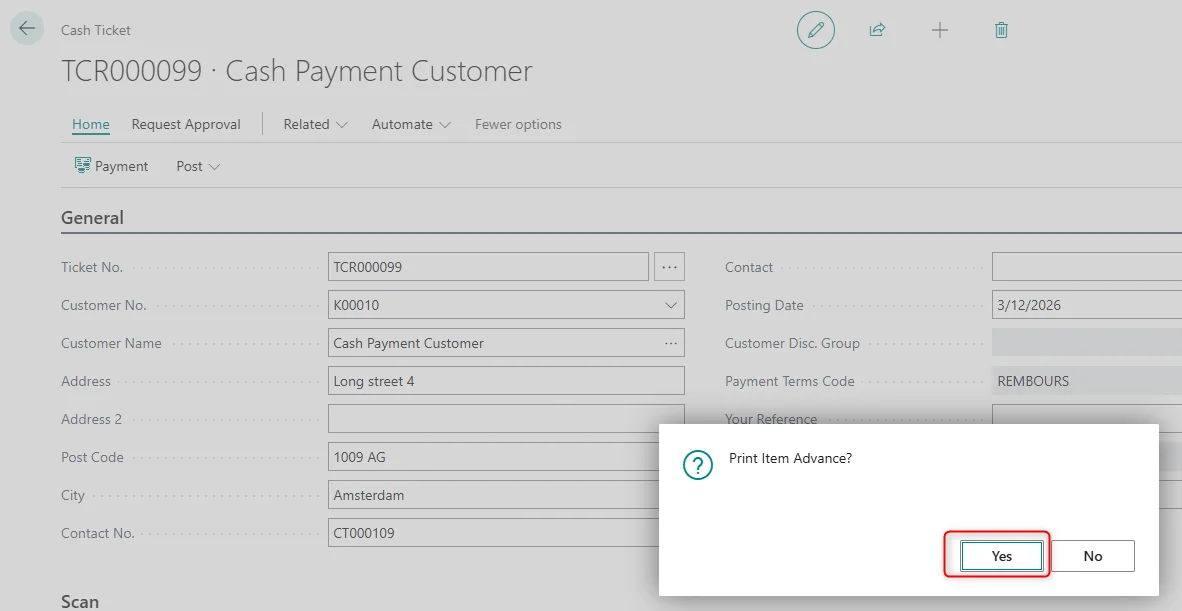
Next, User needs to Post and Print the Ticket.

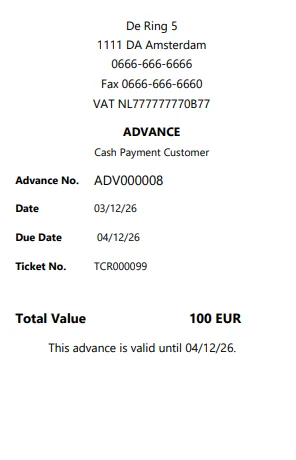
Advance payment process is completed after posting the Cash Ticket, and all operations are logged on the “Audit Log” page.

Processing Customer Returns
A customer return can be processed using a Cash Ticket. If the User does not refund the amount in cash or replace the item, the system can generate a voucher instead. To process a return, the User needs to create a new Cash Ticket following the steps in the Creating Cash Ticket section.
The returned item should be scanned or manually added to the transaction, and the quantity must be entered as a negative number.
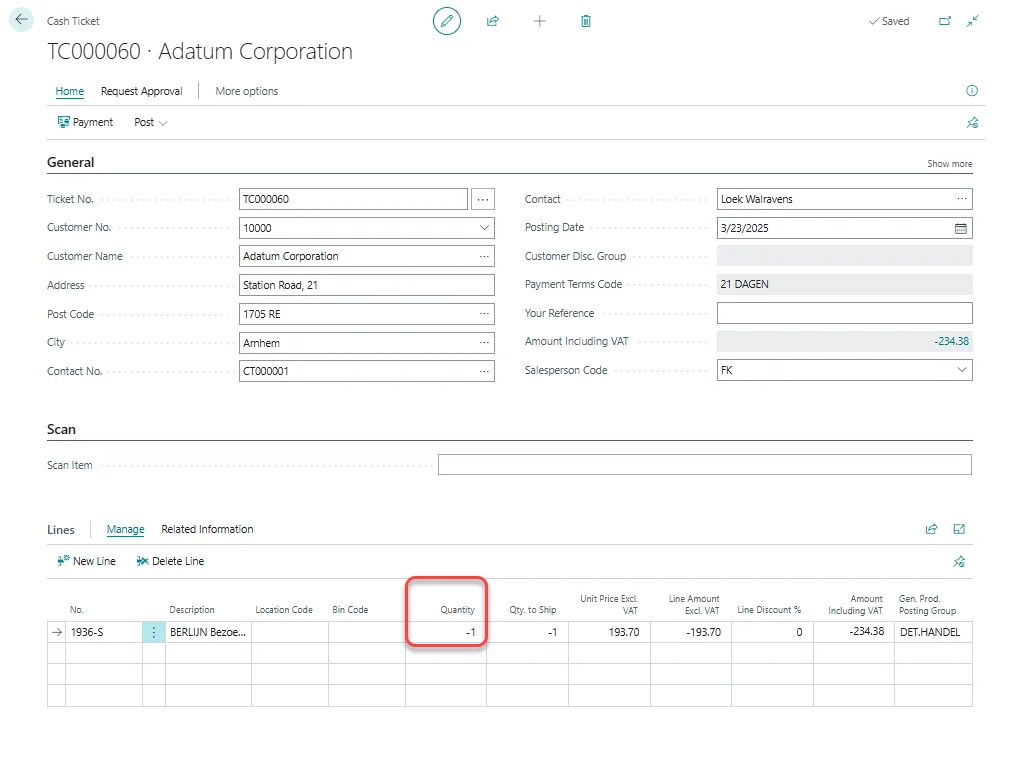
In the “Payment” card, the User selects the refund method and amount.

If the refund is given in cash, the system will round the amount based on the settings in “Cash Register Setup” page.

If no cash refund is provided and the return amount exceeds the minimum voucher amount set in “Cash Register Setup” page, User needs to either “Post and Print Ticket” or “Post” and “Invoice”.
When “Post and Invoice” is selected, Sales Credit Memo will be printed, including both original and a copy as well as corresponding voucher.


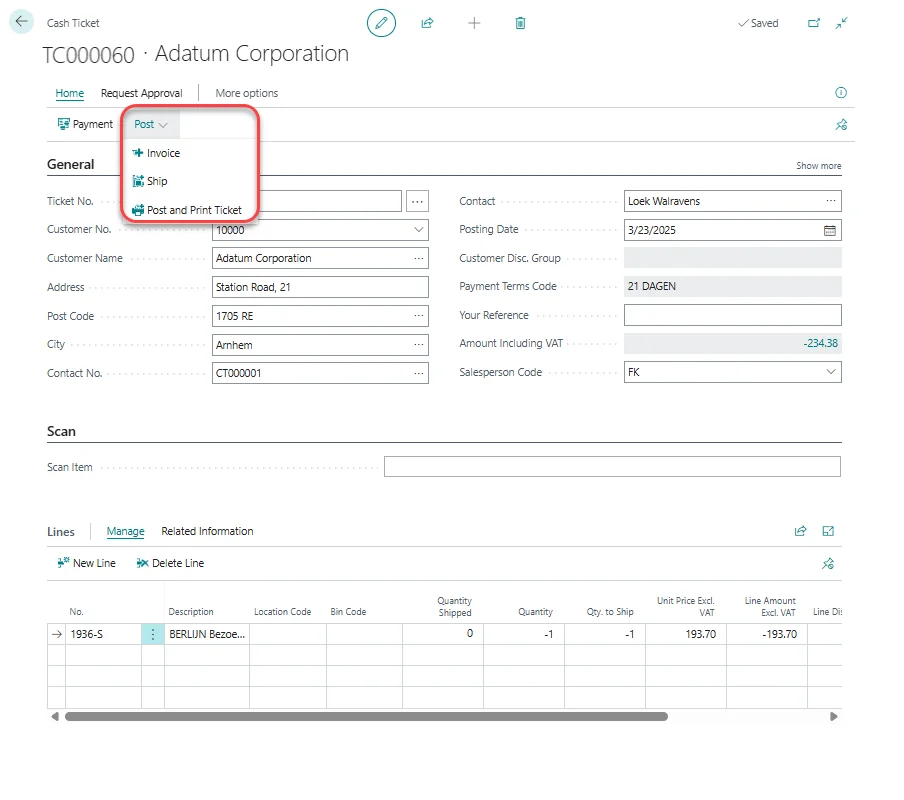
At this point, when “Post and Print Ticket” is selected, Cash Register Return Ticket will be printed, including both original and a copy.

Accordingly, a corresponding Sales Return Order will be created.

If “Post” and “Ship” option is selected, a Posted Return Receipt is created.

Accordingly, a corresponding Sales Return Receipt is printed, including both original and a copy.
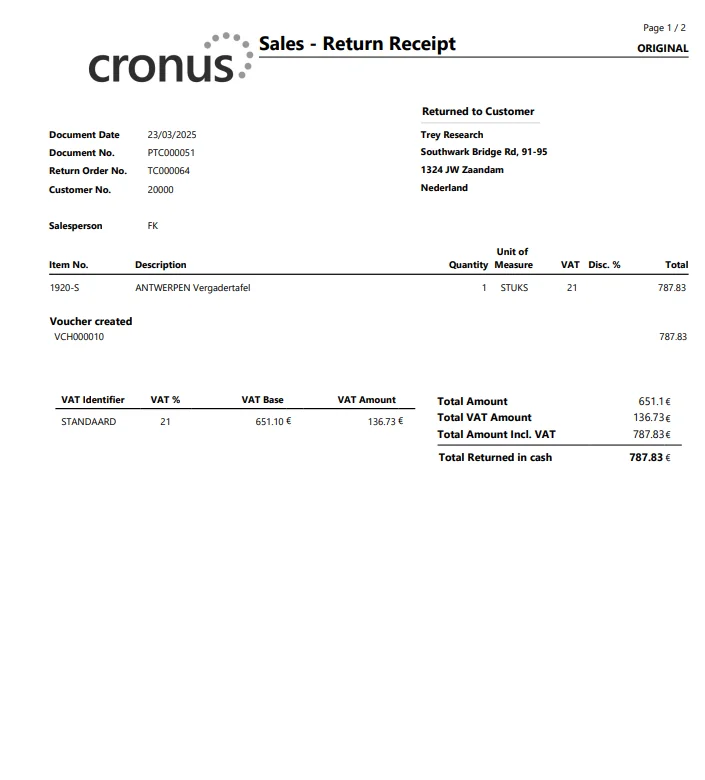
The system will generate a voucher as well, which can then be used by the customer for future purchases.
Cash Transaction List
With this functionality, the User can generate a report of all transactions for a selected day or period. The User can access the “Cash Transaction List” from the “Cash Register” menu on the Empowered Tab in Role Center, or by using the “Search” icon in Business Central.
When opening the Report Layout page, User can configure the following options:
- Printer Selection: Choose the printer for generating the report.
- Open and Close Date: Define the reporting period.
- Money Drawer: Select the relevant cash drawer.
![]()
Clicking the “Preview & Close” button generates an on-screen preview of the report.
![]()
The Transaction List displays all tickets from the selected period, including their payment methods and invoice numbers (if applicable). Additionally, totals for all used payment methods are shown.
A “Control” section provides an overview of all combined payments and refunds.
![]()
User can compare the end-of-day cash count with the total from the initial cash, total payments, and cash in/out transactions.
This report can be customized to meet specific business requirements.
Day Closing
Day Closing functionality allows User to finalize all transactions for a specific day or period. Users can access the “Day Closing” from the “Cash Register” menu on the Empowered Tab in Role Center, or by using the “Search” icon in Business Central.
NOTE: To run a Day Closing, firstly, The User needs to close the Cash Drawer.

- Start Date: the date is predefined and will always be the Work Date. It can be modified as well.
- End date: the date is predefined and will always be the Work Date. It can be modified as well.
- Post: If the “Post” setting is enabled, the system will automatically post the Invoice and Journal entries. If the “Post” setting is disabled, User can review the Invoice and Journal entries before posting them manually.
Sales Invoice will be posted for the Private customer tickets, and the General Journal entries will be created for the selected period.


Users can apply filters to refine the closing process by:
- Money Drawer
- Cash Register
NOTE: The “Day Closing” Report Request page includes two additional checkboxes that are available only in sandbox environments.

- Skip Cash Drawer Closed Validation: This setting allows the User to bypass the system check that verifies whether the cash drawer has already been closed. It is intended for use in SandBox environments only and should not be enabled in production, as it may affect data accuracy and end-of-day processes.
- Only Gen. Journal: This option allows the User to process only the General Journal without performing the full day closing process. It is available for SandBox environments only and is intended for testing or simulation purposes.
Integration
Promotions and Actions
Promotions and Actions functionality can be integrated with the Cash Register module to automatically apply eligible promotions during the sales process. This feature provides additional flexibility and ensures that discounts or promotional offers are correctly applied directly from the Cash Register.
Requirements
To use this functionality, both “Cash Register” and “Promotions and Actions” modules must be enabled in the “Module Configuration” page. The Promotions setup must also be properly configured, including enabling the “Release – Calculate Promotion” boolean.

Functionality
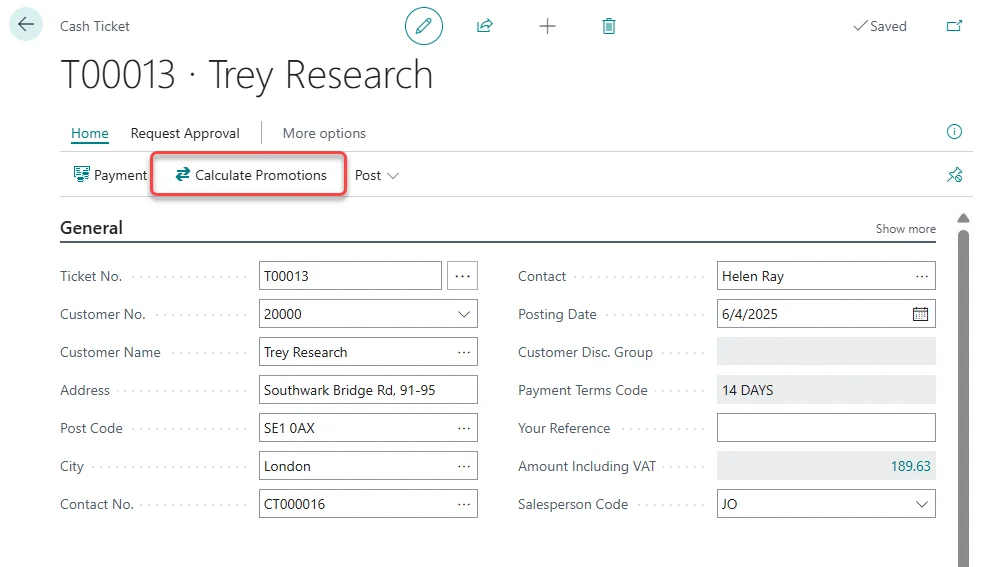
Once both modules are enabled, users can calculate and apply promotions directly on the “Cash Ticket Card” page using the new “Calculate Promotions” action.
When the User initiates the payment process, the system displays a confirmation message: “Would you like to calculate promotions for this ticket? Available promotions will be applied if any are found.”
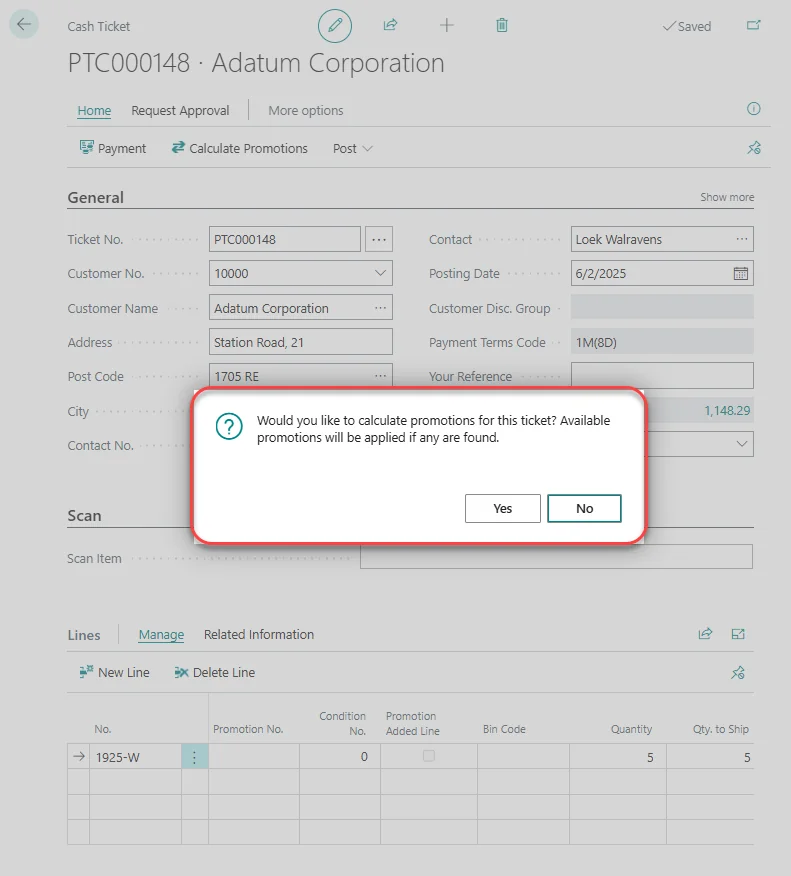
This confirmation message is shown only when the “Release – Calculate Promotion” option is enabled in the “Promotions Setup” page. If the User selects “Yes”, the system automatically searches for any available active promotions and applies them to the current cash ticket.

If the User selects “No”, the payment process continues without applying promotions.
NOTE: More detailed information about the Promotions and Actions functionality and its setup can be found in the Empowered Promotions and Actions User Manual.