Blog |

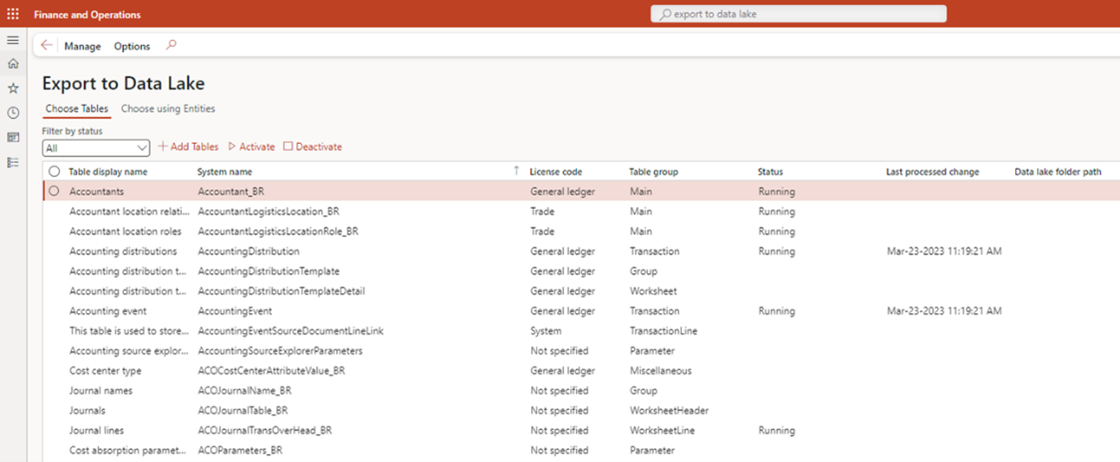
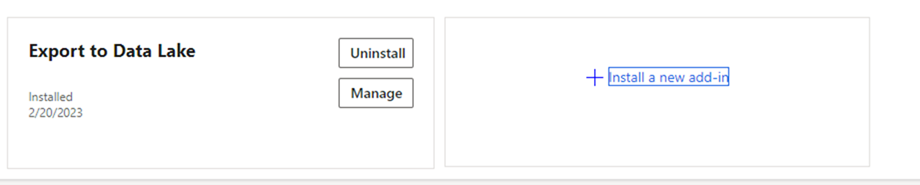
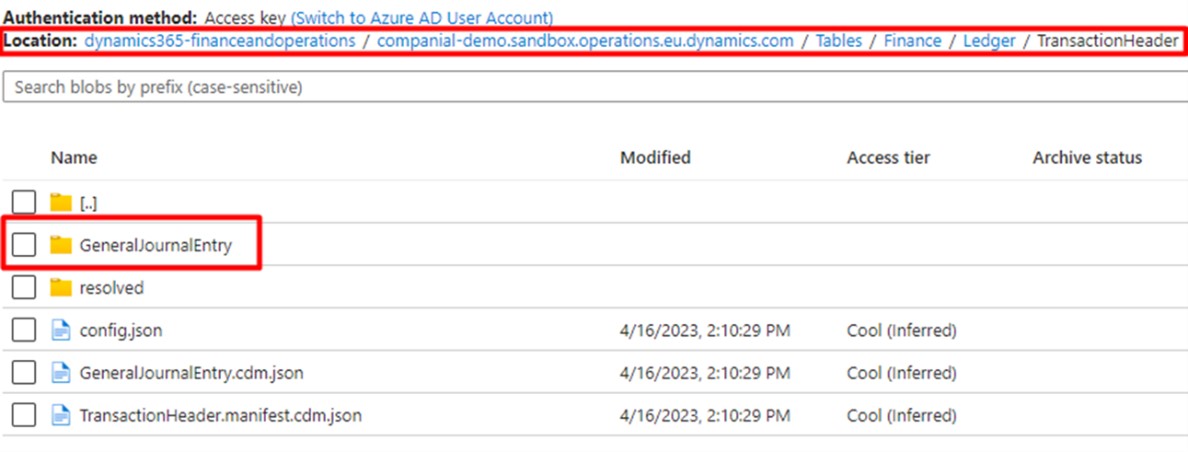
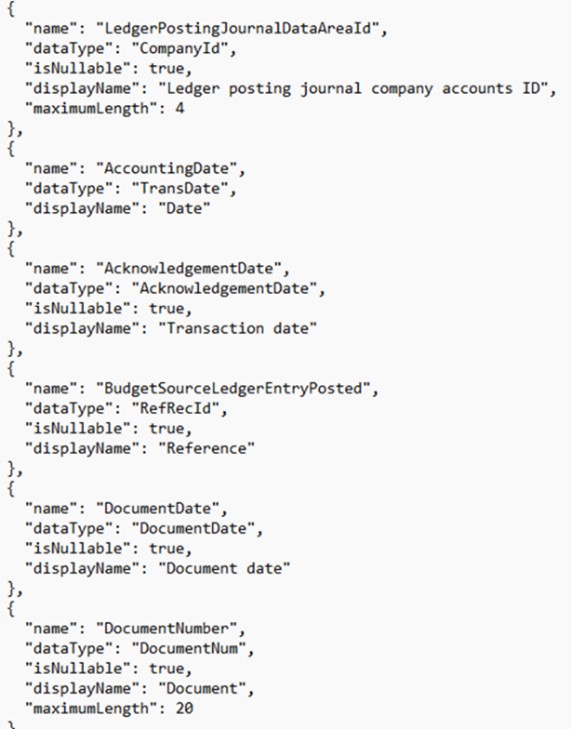
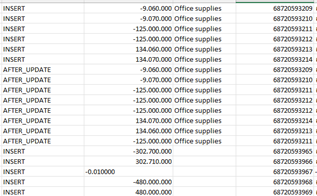
Running Dynamics 365 Finance & Supply Chain Management Data Export with Azure Data Lake V2 and Azure Synapse: Real-Life User Story

Wednesday, August 9, 2023
Reading time: 7 minutes

In today’s data-driven world, businesses need to store, manage, and analyze vast amounts of data from various sources to gain insights and make informed decisions. With the growing complexity and volume of data, traditional storage solutions may not be enough to meet the demands of modern business needs. This is where Azure Data Lake V2 and Azure Synapse come into play.

In this blog, we’ll explore the process of synchronizing data from Microsoft Dynamics 365 Finance & Supply Chain Management to Azure Data Lake, discuss the essential Azure resources required for successful data export, cover the basics of navigating Azure Data Lake V2, and dive into CDMUtil and its key benefits. 

The Data Sync Process: Dynamics 365 F&SCM to Azure Data Lake

We’ll explore the main supported data flow Microsoft utilizes as a best practice. This should be a starting point for companies when discussing exports to Data Lake. This data flow is used for Big Data volumes. That could be your ledger data, financial data, everything that is on the high side, not as a document-based integration but on the high document. This flow was implemented in multiple customer organizations, and it has proven to be working quite successfully. We’ll go through the flow step by step and show how this looks hands-on once you have implemented it.

We’ll start with the Dynamics and the Data Lake integration (see Figure 1). This is the first piece in performing data analysis on your data that you have in the Dynamic 365 F&SCM environment.

Figure 1. Microsoft supported data flow pattern

Key Components - LCS & Dynamics 365

To start with the data export, you need to set up Azure Data Lake extension. With the newest version, Azure Data Lake extensions are quite easy to install. We recommend using a Sandbox environment and a tier 2 environment, as using a development environment you want to keep becomes a bit trickier. When running on Sandbox environments, before setting up the connections, you will need to install the add-in using LCS (Figure 2).

Figure 2. Install add-in using LCS

Installing the add-in is quite simple, just click ‘install new add-in’ and it will build the required integration for you (see Figure 3).

Figure 3. Install new add-in

When you install this integration, you will just need to provide the following parameters:

  • Storage account connections
  • Azure key vault
  • App-id
  • App-secret

The only unique part here is the storage account connection, as Azure Data Lake itself is stored on a storage account within an Azure subscription. Therefore, you will need to decide which Azure subscription you’re going to use and then you can make a connection to any kind of storage account installed on that Azure subscription. One key thing to understand is that you will need to have an Azure subscription to run Data Lake and have full control and full access to the Azure Data Lake. Azure Data Lake is a bit different than typical production environments as it gives you full control over accessing data in real-time in your storage account.

Key Components – Data Lake

Once the setup is done, you will see that you have this form available in Dynamics 365. This form is called ‘Export to Data Lake’ (see Figure 4) and you will see all the tables that you have in Dynamics become active and available. Then, you can select which tables you want to be synchronized into the Data Lake and which tables you want to perform exports on and synchronize.

Figure 4. Export to Data Lake

In this example, we’re activating the general journal account entry table, so one table is being activated and the status is running. With this integration, you don’t control which data is being exported when It will just be exported behind the scenes and you will see the data in Data Lake in near real-time (it can take from a few seconds to 30 seconds). For instance, if you create a new record, that record will be synchronized as it is, without any validations directly in the Data Lake within approximately 30 seconds.

Figure 5. Data Lake

This screenshot (see Figure 5) shows how it looks in Data Lake itself. First of all, we have the location at the top which shows the storage account that we have in Dynamics 365. The storage account connects to Companial’s demo sandbox, which is simply a Sandbox environment, and then you will have the structure of your Data Lake. First, you go to ‘tables’ where all your table schemas are stored and separated based on which business area they are coming from. For example, the finance related tables will go into finance category, the supply chain tables related to warehouses and orders will go into the supply chain category, and so on. In the finance category, we can go into a sub-category called ‘ledger’, and then go to ‘transaction header’, which is the table group. This transaction header will put your data inside the transaction header folder. Once we activate general journal account to entry, it will create a dedicated folder which has the same table name, and within that table name you will see your data coming in.

What is important to understand here is that you can deactivate integration if needed, and it will stop working immediately. Another thing is that all the table schemas that are being replicated will automatically be handled by the Data Lake export, and you will immediately see the changes in the file structures. Also, your new field will just appear, and it will have values just as if it was there from the very start. Therefore, you can make tables and schema changes and that Data Lake integration will not be affected. It will automatically replicate your changes, so you don’t need to resynchronize, you don’t need to stop the integration, you can just use it as is and it will automatically reflect your changes during the next export.

Key Components, Data Lake – Navigation

During the export, the actual schema or the columns in your table that are being stored in separate files are typically called CDM files, and you will always have at least two CDM files. One will just be a CDM file and the other one will be a Metadata file. We have general journal entry CDM and transaction header manifest (see Figure 6) – these files store the metadata properties on your table.

Figure 6. General journal entry CDM and transaction header manifest files.

You’re able to put your table schema in this separated file, so for example, here (see Figure 7) we can see that if we open it up, we have fields like transaction type, transaction date, data area ID, document date, and so on. These are all simply fields that we have in Dynamics 365, but they are being stored where they detail the definition of the schema. Each of the files that gets generated during the Data Lake export will have these columns and the properties will also be stored within these .json files.

Figure 7. Fields in Dynamics 365

Your exports will generate files, so here we have GENERALJOURNALENTRY_ 001.csv (see Figure 8) that is a full table export. Once we run the initial export, it will create this file with CSV structure which will only have the raw data. Also, it doesn’t have headers, it starts with the actual data separated by a comma. You need to combine this source file that contains the data with your CDM/manifest files to  be able to read it, but Azure Data Lake itself only stores raw data and the structure that tells how the data should be consumed, i.e the length is only up to 20 and it won’t have longer than that. Then, it is up to us to build the other components in order to consume this data that is being put in the Data Lake during each export.

Figure 8. General journey entry 001_csv

Azure Data Lake supports two types of data flows –full exports or incremental exports. Full exports are happening all the time, and you will always have one file, which is a CSV file, that contains the full data. If you want to read all the data within a table, go to the general journal CSV and you can read the full data.  Whenever it forms an export, it does a full push, meaning it re-exports everything.

Key Components – Data Lake: Change Feed Structure

The alternative, as mentioned before, is having also incremental pushes or incremental exports. These are used very commonly for data pipelines, when you want to reduce overhead and cost. This way you just get the delta, and you can read only the incremental pieces or the changes that were exported since the last run. In this case, the Data Lake stores a change feed folder, and the idea is that if you enable incremental pushes, then it will only push the changes introduced in the table. These changes will be stored in a separate file that we call the change feed.

Here we have a screenshot of how it looks directly from the CSV (see Figure 9). Each time we introduced a new insert it generated a new record. So, we have incremental push using this change feed structure, and we have full push, which is done using the full file.

Figure 9. CSV

Microsoft-Supported Data Flow Pattern

From here you’ll have your data in your Data Lake, which is in the middle (see Figure 10). The next piece is supplementing with additional components in order to read or consume this data. By itself, it just stays there and it’s pretty difficult to perform data analysis on it because it is not in the SQL structure, but is instead structured as files. Also, the properties are installed in separate .json files and Metadata files, so you need to be able to read both to understand it.

Figure 10. Data in the Data Lake

There are many different data analysis applications available, and depending on which one you choose you may be able to have a direct connection to Data Lake. Power BI, for example, is able to form a direct connection.

CDMUtil – The Easy Way to Work in Data Lake (CDM) Structures

To consume the data, Microsoft proposes using a middleware component called the common data model (CDM) utilization application. This application can be seen in two different ways: as an Azure function or as a Console App. In both cases it allows you to read the data files and the Manifest files. This means it reads the actual data and the structures in the Data Lake, and it is able to convert the metadata into TSQL statements. This tool was built by the Microsoft FastTrack team and it’s available to be downloaded from the FastTrack asset Library.

This tool is only used to actually build the SQL statement, not run it. It’s used to generate a nice definition of the table in SQL, then Data Lake puts it into files which can be used to put it back into SQL. We usually need to combine the tool with something else because by itself you can get some SQL statements, but you still need an engine that is able to run them Therefore, in most cases Microsoft recommends using Azure Synapse. You could use other alternatives to Azure Synapse, or you could supplement it with other pieces, but Azure Synapse is the default engine.

The CDM itself is also able to handle your schema change, so remember when you introduce a new field to a table, that new field introduces a schema change in the Data Lake. That means the CDM files get updated. The Util can understand that there was an update in your CDM file structure, and can give you the updated SQL statement which you can run in Synapse or run in some other Azure service, so it handles it in two different ways. If you want the schema changes to be handled automatically, then you need to deploy it as an Azure Function App.

This Azure Function App is simply a web service that is running on-demand in your Azure subscription, and it is being triggered by an event. This event is raised from your Azure blob storage. By default, Azure blob raises an event once a new file gets uploaded or the old file gets updated or deleted.  The logic here is that you have your nice schema at the top (see Figure 11) and whenever your CDM file gets updated, it raises an event, so that’s a default event grid feature.

Figure 11. CDM file updated

That event is then passed to the function app which generates a new SQL statement based on the change, and then it sends the SQL statement wherever you want. We’re going to look at other synapses, but technically, you can run it with other Azure Computing Services. You could supplement it directly to data bricks or you can supplement it directly to somewhere else. The bottom one (see Figure 11) works the same way except here you don’t deploy it as a function app because they still incur some cost and it’s an extra component. It’s good because it’s automated, so you don’t need to do anything – event gets raised, everything gets updated, and you get new SQL status.

With the console app, you need to run the batch process manually and periodically. In this case, you would open an app, you click the run button, and it looks at your Data Lake CDMs. Then again, it generates new statements that are sent to synapse to perform updates on the schema. This one, you need to run either manually or set up as a recurring job. With the first approach, you don’t need to do anything as it will automatically be updated pretty much in real time.

Azure Synapse & CDM Solution

Azure Synapse is a very strong tool that can be used for data analysis as a standalone app. So, if you want to perform standalone data analysis, you can do it directly in Azure Synapse. Also, it supports connections from different multiple devices and big data systems. What this means is if you have different applications running alongside D365 F&SCM, you can also integrate everything in Azure Synapse, which can be used as an analytic service. You can then push the data forward or you can perform data analysis directly in Synapse.

Also, Synapse by itself can be deployed based on SQL, so it can be a SQL dedicated pool or it can be a SQL serverless pool. You can have multiple SQL servers joined into a pool that is running and giving you a dedicated database in SQL, or you can just have it on demand. We use it on demand when we’re not performing Azure Synapse Analytics directly in the application but just pushing the data into another final stage like the customer’ on-premises or cloud data warehouse. Then, Azure Synapse is simply used as an engine to be able to run the SQL statement, to get the actual data, and then you can push the data using the same Synapse into the final repository.

There are three typical scenarios that we have with Azure Synapse:

  1. Creating tables as Views or External tables on Synapse SQL serverless pool (External tables do not store the data in the Synapse deployment).
  2. Creating F&O Data entities as Views on Synapse SQL pool.
  3. Copying data to Synapse Table in the dedicated pool (DW GEN2).

Azure Synapse & CDM Solution: Integration Scenario

Synapse can be the final place where you put your data, or it can be just another tool that is used as an engine to push the data from the Data Lake into the actual location where you intend to store the data. Synapse itself supports integrations and has a dedicated integration module built in. You can build pipelines to read the data from Synapse, so just run select all or select newest, run your SQL query, and then push the actual data somewhere so you can connect it. Here (see Figure 12) you can see what you can connect to and other activities. You can connect to Azure functions, batches, and data bricks, or you can send it to another Data Lake if needed as it supports simple SQL.

Figure 12. Activities

Here, it also can be supported by pulling requests. For example, you can schedule jobs directly in Synapse and then you can push to Azure Services, but in some cases you need to pull from the cloud as it’s usually simpler. When you do a pull from the cloud, you can just have it reside in Synapse and create reoccurring jobs in SQL that connect to Synapse. Simply do the same statements for select all and select changes. Then you can read the data, get it in your local SQL data warehouse, and connect it to Power Bi, or connect some other analytics tool, run it, and see how it works.

One of the benefits of using Synapse as the solution to run the statement and push it is that it supports monitoring workloads and integration work. Monitoring means that when you build your pipeline, you’ll be able to actually see whether it was successful, you can get notifications when it fails, you can repeat the same push again, and it can be triggered directly from Synapse or it can be triggered based on events. For example, when it fails, it automatically repeats itself and raises an event. Also, once you install CDMutil, it comes with a sample incremental and full export to an outside SQL that can be used. Microsoft gives you a template for full exports and incremental exports to a third-party SQL. This SQL is of course on Azure that you can connect to and that is where the data resides. So, if you’re using Synapse and not storing data because it’s a dedicated analysis service, but you want to store it, then you have to have a dedicated SQL pool. Here we just push it out and then it’s stored by SQL and other applications that are connecting.

We hope we’ve shed light on the intricate process of synchronizing Dynamics 365 Finance & Supply Chain Management data with Azure Data Lake V2 and Azure Synapse. If you’ve missed the webinar focused on this subject, you can watch the recording here 

Whether you’re looking to streamline your data workflows or gain insights from your Dynamics 365 environment, our consultancy and development services are here to support you every step of the way.

Get in touch with us today to explore how you can leverage these technologies for your business success!

Ignas Stockus
More about Finance and Supply Chain Management
Anaxco

Navigating the Dynamics 365 Transition: Anaxco's Journey to Operational Excellence with Companial's Support

Learn more
Efima

Streamlining Efficiency: Companial's Expertise and Exceptional Service Save Time and Resources for Efima's Development Project

Learn more